Yorvipath
Italy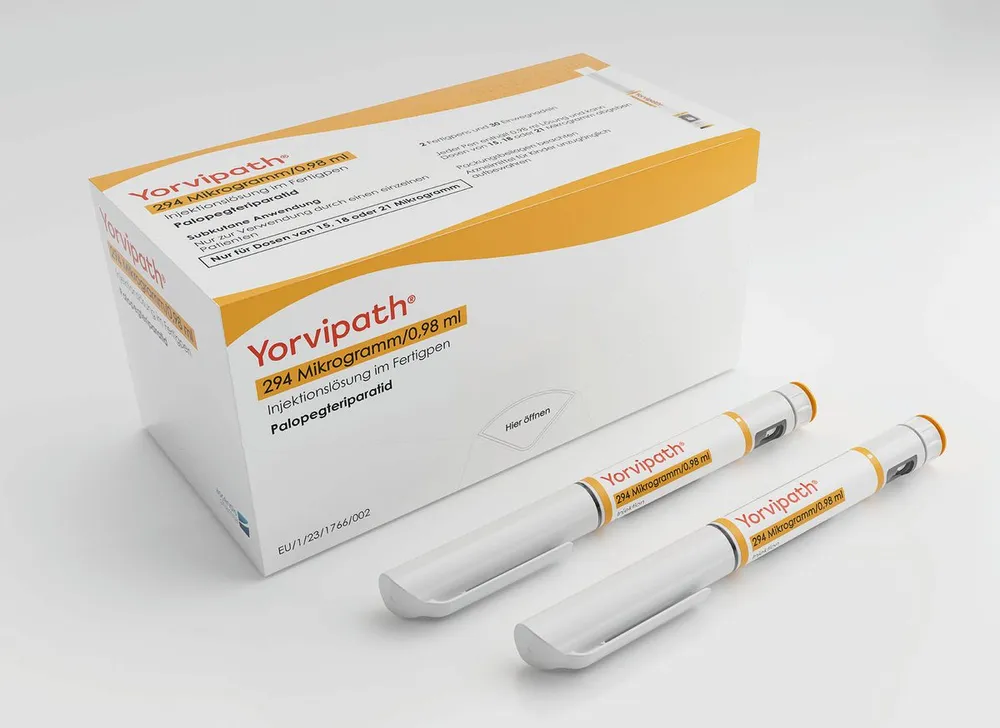
Table of Contents
- Patient Information Leaflet
- Yorvipath 168 micrograms/0.56 mL injection solution in a pre-filled pen, 294 micrograms/0.98 mL injection solution in a pre-filled pen, 420 micrograms/1.4 mL injection solution in a pre-filled pen
- 1. What Yorvipath is and what it is used for
- 2. What you need to know before using Yorvipath
- 3. How to use Yorvipath
- 4. Possible side effects
- 5. How to store Yorvipath
- 6. Package contents and other information
- INSTRUCTIONS FOR USE
- Yorvipath
- Yorvipath used correctly.
- 1. How often should I test the pen flow?
- 2. I do not see drops after testing the pen flow 5 times. What should I do?
- 3. How can I tell that I have completed the injection?
- 4. Why must I keep the pen in the skin for 5 seconds?
- 5. I cannot set the dose selector to the required dose. What should I do?
- INSTRUCTIONS FOR USE
- Yorvipath
- Yorvipath used correctly
- 1. How often should I test the flow of the pen?
- 2. I do not see drops after testing the flow from the pen 5 times. What should I do?
- 3. How can I tell that the injection has been completed?
- 4. Why do I need to keep the pen in the skin for 5 seconds?
- 5. I cannot set the dose selector to the required dose. What should I do?
- INSTRUCTIONS FOR USE
- Yorvipath
- Yorvipath used correctly
- 1. How often should I test the pen flow?
- 2. I do not see drops after testing the flow of the pen 5 times. What should I do?
- 3. How can I tell that I have completed the injection?
- 4. Why do I need to keep the pen in the skin for 5 seconds?
- 5. I cannot set the dose selector to the required dose. What should I do?
- INSTRUCTIONS FOR USE
- Yorvipath
- Using Yorvipath correctly
- 1. How often should I test the pen flow?
- 2. I don't see any drops after testing the flow of the pen 5 times. What should I do?
- 3. How do I know when the injection is complete?
- 4. Why do I need to keep the pen in the skin for 5 seconds?
- 5. I cannot set the dose selector to the required dose. What should I do?
- INSTRUCTIONS FOR USE
- Yorvipath
- Yorvipath used correctly
- 1. How often should I test the pen flow?
- 2. I don't see drops after testing the pen flow 5 times. What should I do?
- 3. How do I know when the injection is complete?
- 4. Why do I need to keep the pen in the skin for 5 seconds?
- 5. I cannot set the dose selector to the required dose. What should I do?
- INSTRUCTIONS FOR USE
- Yorvipath
- Using Yorvipath correctly
- 1. How often should I test the pen flow?
- 2. I don't see drops after testing the flow from the pen 5 times. What should I do?
- 3. How do I know when the injection is complete?
- 4. Why must I keep the pen in the skin for 5 seconds?
- 5. I cannot set the dose selector to the required dose. What should I do?
Patient Information Leaflet
Yorvipath 168 micrograms/0.56 mL injection solution in a pre-filled pen, 294 micrograms/0.98 mL injection solution in a pre-filled pen, 420 micrograms/1.4 mL injection solution in a pre-filled pen
palopegteriparatide
This medicinal product is subject to additional monitoring. This will allow for rapid identification of new safety information. You can help by reporting any side effects you experience while taking this medicine. See the end of section 4 for information on how to report side effects.
Please read this leaflet carefully before using this medicine as it contains important information for you.
- Keep this leaflet. You may need to read it again.
- If you need more information or advice, consult your doctor or pharmacist.
- This medicine has been prescribed for you only. Do not give it to others, even if their symptoms are the same as yours, as it may be harmful.
- If you experience any side effect, including those not listed in this leaflet, consult your doctor, pharmacist, or nurse. See section 4.
Contents of this leaflet
- What Yorvipath is and what it is used for
- What you need to know before using Yorvipath
- How to use Yorvipath
- Possible side effects
- How to store Yorvipath
- Contents of the pack and other information
1. What Yorvipath is and what it is used for
Yorvipath contains the active substance palopegteriparatide. Palopegteriparatide is converted into teriparatide in the body, also known as parathyroid hormone (PTH). PTH occurs naturally in the body and is necessary to maintain calcium and phosphate levels within the normal range.
Yorvipath is used to treat chronic hypoparathyroidism in adults. In people with hypoparathyroidism, the body does not produce PTH or produces too little of it. As a result, they are unable to maintain calcium and phosphate levels within a normal range, leading to symptoms of the disease such as muscle spasms, cramps, and tingling in the fingertips, toes, and lips. Yorvipath replaces the missing PTH to help control calcium and phosphate levels.
2. What you need to know before using Yorvipath
Do not use Yorvipath
- if you are allergic to palopegteriparatide or to any of the other ingredients of this medicine (listed in section 6)
- if you have pseudohypoparathyroidism, a condition in which the body does not respond properly to parathyroid hormone produced by the body
Warnings and precautions
Talk to your doctor, pharmacist, or nurse before using Yorvipath.
If you are being treated with Yorvipath, you may experience side effects related to low or high levels of calcium in the blood (see section 4 for further information). These side effects are more likely to occur at the beginning of treatment or when the dose is changed. Your doctor will monitor your calcium levels (see "Examinations and checks" in section 3). You may be given medicines to treat or help prevent these side effects, or your dose may need to be adjusted.
High levels of calcium in the blood may cause problems if you are taking medicines containing cardiac glycosides (such as digoxin or digitoxin) (see "Other medicines and Yorvipath"). Your doctor will monitor your calcium (see 'Examinations and checks' in section 3) and glycoside levels and will monitor you for signs and symptoms.
If you are taking Yorvipath and have severe renal or hepatic impairment, your doctor will monitor your calcium levels more frequently (see 'Examinations and checks' in section 3).
Inform your doctor if you are at increased risk of developing a type of bone cancer called osteosarcoma. This is particularly important:
- if you are currently undergoing or have previously undergone radiotherapy to the skeleton
- if you have bone cancer or another type of cancer that has spread to the bones
- if you have a bone disease that increases the risk of developing osteosarcoma (e.g., Paget's disease)
- if a blood test shows unexplained increases in bone alkaline phosphatase
If you are at risk of bone fractures, your doctor will evaluate you for osteoporosis.
Children and adolescents
Yorvipath must not be used in children or adolescents under 18 years of age, as it has not been studied in this age group.
Other medicines and Yorvipath
Inform your doctor, pharmacist, or nurse if you are taking, have recently taken, or might take any other medicines. In particular, inform your doctor if you are taking or have recently taken any of the following medicines:
- Medicines for the heart containing cardiac glycosides (such as digoxin or digitoxin)
- Medicines used to treat osteoporosis, such as bisphosphonates, denosumab, or romosozumab
- Medicines that may affect calcium levels in the blood, such as diuretics ("water tablets", such as thiazide hydrochloride or furosemide), systemic corticosteroids (medicines used to treat inflammation), and lithium (a medicine used to treat mood disorders)
Your doctor may need to adjust the dose of these medicines or the dose of Yorvipath.
Pregnancy, breastfeeding, and fertility
If you are pregnant, think you may be pregnant, are planning a pregnancy, or are breastfeeding, consult your doctor or pharmacist before taking this medicine.
Pregnancy
If you think you may be pregnant or are planning a pregnancy, inform your doctor. If you become pregnant during treatment, inform your doctor immediately.
There is limited information on the safety of Yorvipath in pregnant women. Your doctor will decide whether you should be treated with Yorvipath during pregnancy. If you are pregnant or planning a pregnancy, your doctor may monitor your calcium levels.
Breastfeeding
If you are breastfeeding or intend to breastfeed, consult your doctor about the use of Yorvipath. Your doctor will decide whether you should be treated with Yorvipath during breastfeeding. If you are breastfeeding, your doctor may monitor your calcium levels.
Fertility
It is not known whether Yorvipath has effects on fertility.
Driving and using machines
Yorvipath has no or negligible effect on the ability to drive or use machines.
However, if you feel dizzy, faint, or lightheaded when standing up, do not drive or use machines until you feel better.
Yorvipath contains sodium
This medicine contains less than 1 mmol (23 mg) of sodium per dose, i.e., essentially 'sodium-free'.
3. How to use Yorvipath
Use this medicine exactly as instructed by your doctor or nurse. If you have any doubts, consult your doctor.
Yorvipath is administered as an injection under the skin (subcutaneous injection). This means it is injected with a short needle into the fatty tissue beneath the skin. The medicine must be injected into the abdomen (belly) or the front part of the thigh. It is important to inject it daily into a different area to avoid damaging the skin. You may alternate between the left and right side of the abdomen and between the left and right front part of the thigh.
Before using the pen for the first time, your doctor, pharmacist, or nurse will show you how to inject Yorvipath. Further instructions on how to use Yorvipath are provided in the instructions for use at the end of this leaflet.
Always use the pen exactly as described in the instructions for use.
Starting, adjusting, and maintaining Yorvipath dosage
Your doctor will perform a blood test to check your calcium and vitamin D levels before starting treatment with Yorvipath.
The recommended starting dose of Yorvipath is 18 micrograms once daily. Your doctor may advise you to gradually adjust the dose based on your response to the medicine until a dose is reached that maintains calcium levels in your body within the normal range without requiring active vitamin D or therapeutic doses of calcium. Your doctor may instruct you to continue taking daily calcium supplements to meet dietary needs. The dose may be increased only if at least 7 days have passed since the last dose adjustment. The dose may be reduced no more frequently than every 3 days if calcium levels in your body are too high.
Tests and monitoring
Your doctor will monitor your response to treatment:
- 7 days after starting treatment, and
- 7 to 14 days after any dose adjustment.
This will be done through tests measuring calcium levels in your blood or urine. Your doctor may instruct you to adjust the amount of calcium or vitamin D you take (in any form, including calcium-rich foods).
Instructions for use
If your dose is higher than 30 micrograms per day:
- Administer two injections, one after the other, at different injection sites.
- It is recommended to use a different Yorvipath pen for the second daily injection, even if both pens have buttons of the same color (same strength).
- The table below explains how to administer the dose. If you have any doubts, consult your doctor.
Recommended dosing schedule for Yorvipath doses above 30 micrograms/day
| Dose | Dosing schedule | Which pen to use? |
|------|------------------|-------------------|
| 33 micrograms/day | + 15 micrograms/day | First injection with Yorvipath pen 294 micrograms/0.98 mL (orange button) |
| 36 micrograms/day | + 18 micrograms/day | First injection with Yorvipath pen 294 micrograms/0.98 mL (orange button) |
| 39 micrograms/day | + 21 micrograms/day | Second injection with Yorvipath pen 294 micrograms/0.98 mL (orange button) |
| 42 micrograms/day | + 21 micrograms/day | First injection with Yorvipath pen 294 micrograms/0.98 mL (orange button) |
| 45 micrograms/day | + 24 micrograms/day | Second injection with Yorvipath pen 420 micrograms/1.4 mL (burgundy button) |
| 48 micrograms/day | + 24 micrograms/day | 24 micrograms/day |
| 51 micrograms/day | + 27 micrograms/day | First injection with Yorvipath pen 420 micrograms/1.4 mL (burgundy button) |
| 54 micrograms/day | + 27 micrograms/day | Second injection with Yorvipath pen 420 micrograms/1.4 mL (burgundy button) |
| 57 micrograms/day | + 30 micrograms/day | 30 micrograms/day |
| 60 micrograms/day | + 30 micrograms/day | 30 micrograms/day |
If you use more Yorvipath than you should
Contact your doctor or nurse immediately and describe all symptoms you are experiencing.
An overdose may lead to high levels of calcium in the blood. Symptoms may include, but are not limited to, feeling unwell (nausea, vomiting), dizziness, thirst, confusion, muscle weakness, and irregular heartbeat. For further information, see section 4.
If you forget to use Yorvipath
If you forget to inject a dose of Yorvipath, you may take the medicine as soon as you remember, provided less than 12 hours have passed. For example, if you normally inject the medicine at 8 a.m., you may inject the missed dose before 8 p.m.
If you remember taking the dose within 12 hours of your next scheduled dose, skip the missed dose and continue injecting your next dose as usual. For example, if at 10 p.m. you remember you forgot to inject Yorvipath and your next dose is scheduled for 8 a.m., do not inject the missed dose.
Never take a second dose to make up for a missed dose.
If you stop using Yorvipath
Do not stop using Yorvipath without consulting your doctor. If you stop treatment with Yorvipath, calcium levels in your blood may decrease, and you may develop the symptoms described below (see section 4).
If you have any doubts about how to use Yorvipath, consult your doctor or nurse.
4. Possible side effects
Like all medicines, this medicine can cause side effects, although not everyone experiences them.
Some side effects could be considered serious
Common serious side effects (may affect up to 1 in 10 people):
- High levels of calcium in the blood (hypercalcemia)
- Symptoms may include, but are not limited to, feeling unwell (vomiting), dizziness, feeling thirsty, confusion, muscle weakness, and irregular heartbeat.
- Hypercalcemia is more likely to occur within the first 3 months of starting treatment or if your dose of Yorvipath is changed.
- Low levels of calcium in the blood (hypocalcemia)
- Symptoms may include, but are not limited to, tingling in the fingertips, feet, and lips (paresthesia), muscle spasms and cramps, oral numbness, and seizures.
- Hypocalcemia is more likely to occur if you stop treatment with Yorvipath, even briefly or completely, or if your dose of Yorvipath is changed.
Contact your doctor immediately if you experience any of the symptoms listed above, as they may be signs of these side effects. Your doctor will check your calcium levels. It may be necessary to adjust your dose of Yorvipath or temporarily stop the injections. You may be given medicines to treat or help prevent these side effects, or you may be asked to stop taking certain medicines you are currently using. These medicines may include calcium or vitamin D. Some laboratory tests may be required.
Other side effects include:
Very common side effects (may affect more than 1 in 10 people)
- Headache
- Tingling in the fingertips, feet, and lips (paresthesia)
- Feeling unwell (nausea)
- Feeling tired (fatigue)
- Redness, bruising, pain, bleeding, rash, or swelling at the injection site (injection site reactions)
Common side effects (may affect up to 1 in 10 people)
- Sensation of rapid or pounding heartbeat (palpitations)
- Dizziness
- Feeling faint (pre-syncope)
- Fainting (syncope)
- Dizziness, mental clouding, or fainting when sitting or standing up (orthostatic hypotension)
- Dizziness, mental clouding, or fainting with increased heart rate when sitting or standing up (postural orthostatic tachycardia syndrome)
- Sore mouth or sore throat (oropharyngeal pain)
- Diarrhea
- Constipation
- Feeling unwell (vomiting)
- Abdominal pain
- Abdominal discomfort
- Joint pain (arthralgia)
- Muscle pain (myalgia)
- Weakness (asthenia)
- Thirst
- Rash
- Skin reaction to sunlight (photosensitivity reaction)
- Need to urinate at night (nocturia)
- Muscle cramp
- Pain in muscles and bones (musculoskeletal pain)
Uncommon side effects (may affect up to 1 in 100 people)
- Chest pain
- Chest discomfort
- High blood pressure (hypertension)
Not known (frequency cannot be estimated from the available data)
- Need to urinate frequently (polyuria)
- Reduction in bone density
If you experience any side effects or symptoms that concern you, contact your doctor or nurse.
Reporting of side effects
If you experience any side effect, including those not listed in this leaflet, talk to your doctor, pharmacist, or nurse. You can also report side effects directly through the national reporting system listed in Annex V. By reporting side effects, you can help provide more information on the safety of this medicine.
5. How to store Yorvipath
Keep this medicine out of the sight and reach of children.
Do not use this medicine after the expiry date stated on the carton after "Exp". The expiry date refers to the last day of that month.
Before first use:
Store in the refrigerator (2 °C – 8 °C). Do not freeze.
Keep in the original packaging with the pen cap attached to protect the medicine from light.
After first use:
Store at a temperature below 30 °C.
Keep the pen cap on the pre-filled pen to protect the medicine from light.
Dispose of each pen 14 days after first use.
Do not use this medicine if you notice that the solution is cloudy, discoloured, or contains visible particles.
Do not dispose of any medicine via wastewater or household waste. Ask your pharmacist how to dispose of medicines no longer required. This will help protect the environment.
6. Package contents and other information
What Yorvipath contains
- The active substance is palopegteriparatide.
- The excipients are succinic acid, mannitol, metacresol, sodium hydroxide (see section 2, "Yorvipath contains sodium"), hydrochloric acid (for pH adjustment), and water for injections.
Yorvipath is a solution for subcutaneous injection in a pre-filled pen available in three presentations:
Yorvipath 168 micrograms/0.56 mL
Each pre-filled pen contains palopegteriparatide equivalent to 168 micrograms of PTH(1-34) in 0.56 mL of solvent. The concentration based on PTH(1-34) is 0.3 mg/mL.
Yorvipath 294 micrograms/0.98 mL
Each pre-filled pen contains palopegteriparatide equivalent to 294 micrograms of PTH(1-34) in 0.98 mL of solvent. The concentration based on PTH(1-34) is 0.3 mg/mL.
Yorvipath 420 micrograms/1.4 mL
Each pre-filled pen contains palopegteriparatide equivalent to 420 micrograms of PTH(1-34) in 1.4 mL of solvent. The concentration based on PTH(1-34) is 0.3 mg/mL.
Description of the appearance of Yorvipath and contents of the pack
Yorvipath is a clear, colourless, particle-free injectable solution in a pre-filled pen.
Yorvipath is available in packs containing 2 pre-filled pens (with or without 30 disposable needles) for 28 days of treatment. Each pre-filled pen provides 14 days of treatment.
Not all pack sizes may be marketed.
The colours corresponding to the dosage strengths are indicated on the outer and inner carton, on the label, and on the button of the pre-filled pen, as follows:
| Colour | Presentation |
| Blue | Yorvipath 168 micrograms/0.56 mL |
| Orange | Yorvipath 294 micrograms/0.98 mL |
| Bordeaux | Yorvipath 420 micrograms/1.4 mL |
Marketing Authorization Holder
Ascendis Pharma Bone Diseases A/S
Tuborg Boulevard 12
DK-2900 Hellerup
Denmark
Manufacturer
Ascendis Pharma A/S
Tuborg Boulevard 12
DK-2900 Hellerup
Denmark
For further information on this medicinal product, please contact the local representative of the Marketing Authorization Holder:
Belgium/Belgium/Belgium Lithuania
Ascendis Pharma Bone Diseases A/S Ascendis Pharma Bone Diseases A/S
Tel: +32 2 790 6340 Tel: +45 70 22 22 44
Bulgaria Luxembourg/Luxembourg
Ascendis Pharma Bone Diseases A/S Ascendis Pharma Bone Diseases A/S
Tel: +45 70 22 22 44 Tel: +45 70 22 22 44
Czech Republic Hungary
Ascendis Pharma Bone Diseases A/S Ascendis Pharma Bone Diseases A/S
Tel: +45 70 22 22 44 Tel: +45 70 22 22 44
Denmark Malta
Ascendis Pharma Bone Diseases A/S Ascendis Pharma Bone Diseases A/S
Tel: +45 88 74 22 67 Tel: +45 70 22 22 44
Germany Netherlands
Ascendis Pharma Bone Diseases A/S Ascendis Pharma Bone Diseases A/S
Tel: +49 800 0011 166 Tel: +31 20 259 2731
Estonia Norway
Ascendis Pharma Bone Diseases A/S Ascendis Pharma Bone Diseases A/S
Tel: +45 70 22 22 44 Tel: +47 23 50 24 80
Greece Austria
Ascendis Pharma Bone Diseases A/S Ascendis Pharma Bone Diseases A/S
Tel: +45 70 22 22 44 Tel: +43 1 205 636 7700
Spain Poland
Ascendis Pharma Iberia, S.L. Ascendis Pharma Bone Diseases A/S
Tel: +34 910 798 364 Tel: +45 70 22 22 44
France Portugal
Ascendis Pharma France SAS Ascendis Pharma Bone Diseases A/S
Tel: +33 1 72 35 02 00 Tel: +351 21 124 8316
Croatia Romania
Ascendis Pharma Bone Diseases A/S Ascendis Pharma Bone Diseases A/S
Tel: +45 70 22 22 44 Tel: +45 70 22 22 44
Ireland Slovenia
Ascendis Pharma Bone Diseases A/S Ascendis Pharma Bone Diseases A/S
Tel: +44 20 4570 1942 Tel: +45 70 22 22 44
Iceland Slovakia
Ascendis Pharma Bone Diseases A/S Ascendis Pharma Bone Diseases A/S
Tel: +45 70 22 22 44 Tel: +45 70 22 22 44
Italy Finland
Ascendis Pharma Bone Diseases A/S Ascendis Pharma Bone Diseases A/S
Tel: +39 02 8128 1581 Tel: +358 64 60 41 367
Cyprus Sweden
Ascendis Pharma Bone Diseases A/S Ascendis Pharma Bone Diseases A/S
Tel: +45 70 22 22 44 Tel: +46 8 502 414 23
Latvia
Ascendis Pharma Bone Diseases A/S
Tel: +45 70 22 22 44
Additional sources of information
More detailed information on this medicinal product is available on the website of the European Medicines Agency, https://www.ema.europa.eu. In addition, links to other websites on rare diseases and related therapeutic treatments are provided.
This leaflet is available in all European Union/European Economic Area languages on the European Medicines Agency website.
The Instructions for Use containing information on how to administer the Yorvipath injection are provided on the reverse side of this leaflet.
INSTRUCTIONS FOR USE
Yorvipath
168 micrograms/0.56 mL
For doses of 6, 9 or 12 micrograms only
Solution for injection in pre-filled pen
palopegteriparatide
For subcutaneous use
These instructions for use contain
information on how to inject
Yorvipath
Additional information
If you do not understand or are unable to complete any step described in these instructions for use,
please consult your doctor or nurse.
Important information to know before using the Yorvipath pen
Read and carefully follow the package leaflet and these instructions for use to correctly administer the injection
Yorvipath used correctly.
Make sure you have received training from your doctor or nurse before injecting. This is
important to ensure you receive the correct treatment.
For correct use
- If you do not follow these instructions, you may not receive the correct dose and therefore may not get the full benefit of the medicine.
- If you are blind or partially sighted, or if you have difficulty concentrating, do not use the pen without help. Instead, ask for assistance from someone trained to use the Yorvipath pen.
- Keep out of the sight and reach of children.
- The pen and needles are for use by a single patient only.
- Do not share the pen or needles with other people, as this could lead to infection (cross-contamination).
- Always dispose of the pen after 14 days of use, even if it still contains medicine. This is important to ensure you get the full benefit of the medicine.
- Always use the needles supplied with the Yorvipath pen for your injections.
- Remove the needle after each use. Do not store the pen with the needle attached.
- Avoid bending or breaking the pen needle.
- Do not change the injection angle once the needle has been inserted into the skin. Changing the angle may cause the needle to bend or break. A bent or broken needle may become trapped in the body or remain completely under the skin. If a broken needle becomes stuck in the body or remains under the skin, consult a doctor immediately.
- Do not use needles if the cap or foil seal is damaged.
Pen handling
- Handle the pen carefully.
- Keep the pen dry.
- Use a damp cloth to clean the pen.
- Do not drop or knock the pen against hard surfaces. If this happens, recheck the pen flow (Section 2, steps A–C) before the next use.
- Do not apply excessive force to the pen. It may be empty, damaged, or no longer function properly.
- Do not attempt to repair a damaged pen yourself.
- Never use a damaged pen.
Troubleshooting
1. How often should I test the pen flow?
To avoid wasting the medicine, you should test the pen flow (section 2) only the first time you use a new pen (or if you think it may be damaged). This test verifies that the medicine flows properly through the pen, ensuring accurate dosing.
2. I do not see drops after testing the pen flow 5 times. What should I do?
If you do not see a drop at the needle tip after 5 attempts, there may be no flow through the pen and needle.
Replace the needle (see section 5, step 13) and test the pen flow again (see section 2, steps A–C). The flow will work properly when you see the drop of medicine.
If it still does not work, dispose of the pen and contact your doctor.
3. How can I tell that I have completed the injection?
The injection is complete only after you have pressed the button fully down, the dose selector has returned to "●", and you have kept the needle in the skin for 5 seconds.
4. Why must I keep the pen in the skin for 5 seconds?
Some medication might flow back into the pen or leak out from the injection site and remain
on the skin. Keeping the pen in the skin for 5 seconds helps ensure that the entire dose of medication is
injected.
5. I cannot set the dose selector to the required dose. What should I do?
The pen does not allow you to set a dose higher than the amount of medicine remaining in the pen.
If your dose is greater than the amount of medicine left in the pen, you will not be able to
set a complete dose. You must discard the pen and administer the full dose using a new pen.
- The red needle protection device covers the needle before starting the injection. What should I do?
Unscrew and discard the used needle (see section 5, step 13). Take a new needle from the box and
restart from step 1. Each box contains one extra needle.
Description of components
Figure A
Symbols:

Droplets End of dose

Doses (6, 9 or 12 micrograms)
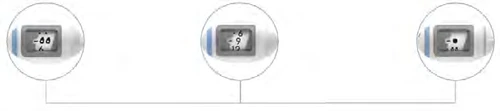

Button

Dose selector Pen cap Inspection window Pen Label


Dose window
Pen inspection window
Needle protection device
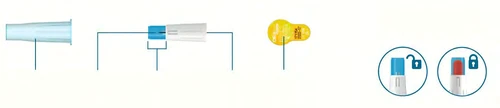
single-use:
Needle cap Needle tip Blue dial Needle Flange
Note: there is no medicine inside the needle.
You will also need
Figure B
1 Prepare the pen and needle
Step 1
Figure C
Take your Yorvipath pen. Check that it is
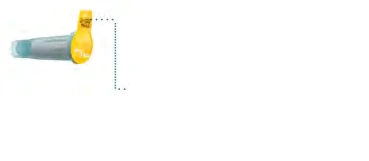
the correct strength and verify the expiry date.
Take a needle and check the expiry date
Expiry date
on the needle (Figure C).
Expiry date
Note: remove the pen from the
refrigerator 20 minutes before first use.
Step 2
Figure D
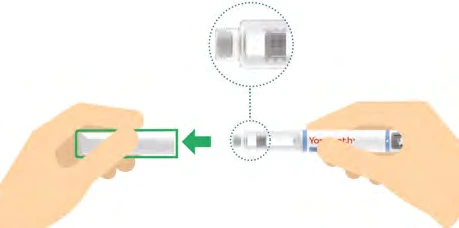
Remove the pen cap and check the
inspection window to ensure that the
medicine inside the pen is clear and colourless
(Figure D).
Important: if the medicine contains
visible particles, do not use the pen; instead, take a new one.
Step 3
Figure E
Remove the tab from the needle (Figure E).
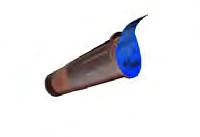
This needle can only be used once,
and once used, it will lock.
Always use a new needle for each
injection.
Step 4 Figure F
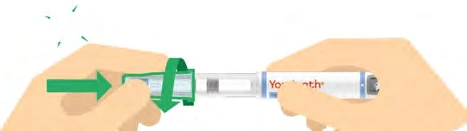
Attach the needle straight onto the pen, then
screw it onto the pen until secure (it will not
tighten completely) (Figure F).
Step 5 Figure G
Remove the needle cap (Figure G) and
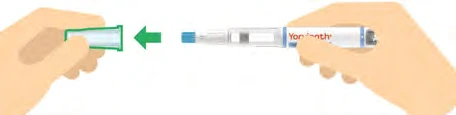
dispose of it.
Important: do not touch the blue dial, as it may lock the needle.
2 For a new pen, check the flow
Day
Check the pen flow (steps A – C) only the first time you use a new pen.
If the pen is already in use, go to section 3 "Prepare the injection and select the dose".
Step A
Figure H
Turn the dose selector clockwise
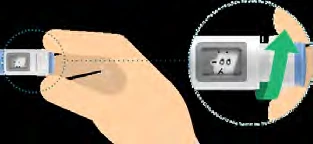
(to the right) until you hear 2 clicks, until you
see the droplet symbol “ ” in the
dose window (Figure H).
Note: you can always adjust the selection by rotating the dose selector.
Step B

Figure I
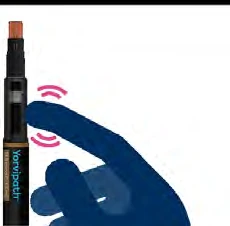

Tap the inspection window gently to bring any air bubbles to the top of the pen (Figure I). Hold the pen with the needle tip pointing upwards.
Note: small air bubbles are acceptable.
Step C
Figure J
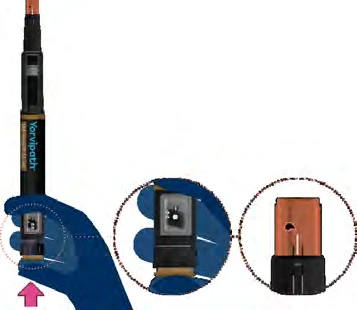
Press the button and watch for medicine droplets to appear at the needle tip. When pressing, ensure that the dose selector rotates again to the symbol “●” (Figure J).
Important: if you do not see medicine droplets, repeat this test (steps A–C) up to 5 times. If you still do not see droplets, change the needle and repeat the test.
3 Prepare the injection and select the dose
Step 6
Figure K
Front
Select the injection site. There are two areas of the body where you can give the injection (Figure K).
Abdomen (at least 5 cm away from the navel)
Avoid injecting where the skin is red, swollen, or scarred.
Front of thighs
Choose a different injection site each time you administer an injection.
Step 7
Figure L
Use an alcohol wipe
Wash your hands and clean the injection site with an alcohol wipe (Figure L).
Step 8
Figure M
Select the dose prescribed by your doctor
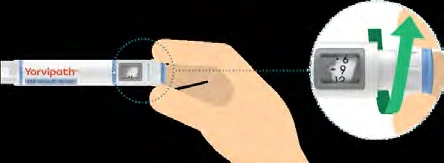
(6, 9 or 12 micrograms) by turning the dose selector clockwise (to the right) (Figure M).
Important: make sure not to press the button while selecting the dose, to avoid wasting medicine.
Note: always discard the pen and use a new one if you cannot set a complete dose.
4 Inject the dose
Use the injection technique recommended by your doctor or nurse. Read the entire section (steps 9–12) before starting the injection.
Step 9
Figure N
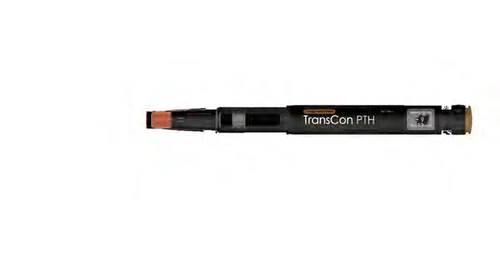
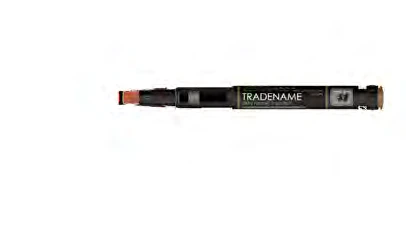
Hold the pen so that the blue dial is positioned on the injection site. Make sure you can see the dose window (Figure N).
Step 10
Figure O
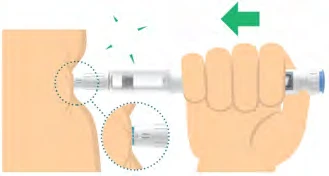
Push the pen straight onto the skin until you hear a click and the blue dial is no longer visible (Figure O).
Step 11
Figure P
Press…
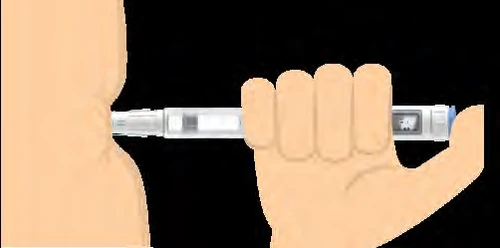
Press the button fully and hold it for 5 seconds. Ensure that the dose selector rotates again to the symbol “●”. This means you have delivered the complete dose (Figure P).
Step 12
Slowly remove the pen from the injection site.
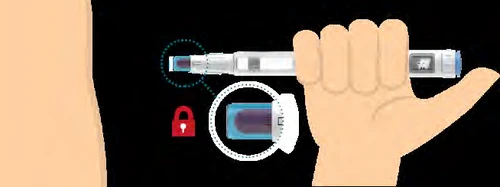
The blue dial automatically locks around the needle, and a red lock symbol becomes visible (Figure Q).
5 Dispose of the used needle
Step 13 Figure R
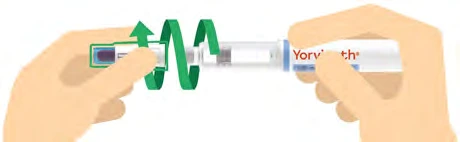
Unscrew the needle and dispose of it safely in accordance with local regulations (Figure R).
Do not attempt to recap the needle, as you may get pricked from the back end.
Step 14 Figure S
Securely attach the pen cap onto the pen
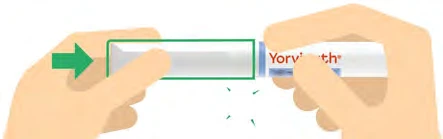
to protect it between injections and to protect the medicine from light (Figure S).
6 Dispose of the used pen
Day
Figure T
Important: always dispose of the pen 14 days after first use, in accordance with local regulations. It is recommended to fill in the "Date opened:" field on the inner carton to keep track of when 14 days have passed.
Always dispose of the pen and any unused needles after 14 days of use, even if there is still medicine left in the pen (Figure T). This is important to ensure you receive the full benefit of the medicine.
INSTRUCTIONS FOR USE
Yorvipath
294 micrograms/0.98 mL
For doses of 15, 18 or 21 micrograms only
Injectable solution in a pre-filled pen
palopegteriparatide
For subcutaneous use
These instructions for use contain
information on how to inject
Yorvipath
Additional information
If you do not understand or are unable to complete any step described in these instructions for use,
please consult your doctor or nurse.
Important information to know before using the Yorvipath pen
Read and carefully follow the package leaflet and these instructions for use to correctly administer the injection
Yorvipath used correctly
Make sure you have received training from your doctor or nurse before injecting. This is
important to ensure you receive the correct treatment.
For correct use
- If you do not follow these instructions, you may not receive the correct dose and therefore may not get the full benefit of the medicine.
- If you are blind or have low vision, or if you have difficulty concentrating, do not use the pen without help. Instead, ask for help from a person trained in the use of the Yorvipath pen.
- Keep the pen and needles out of the sight and reach of children.
- The pen and needles are for use by a single patient only.
- Do not share the pen or needles with other people, as this could lead to infection (cross-contamination).
- Always dispose of the pen after 14 days of use, even if it still contains medicine. This is important to ensure you get the full benefit of the medicine.
- Always use the needles supplied with the Yorvipath pen for your injections.
- Remove the needle after each use. Do not store the pen with the needle attached.
- Avoid bending or breaking the pen needle.
- Do not change the injection angle once the needle has been inserted into the skin. Changing the angle may cause the needle to bend or break. A bent or broken needle may become trapped in the body or remain completely under the skin. If a broken needle becomes stuck in the body or remains under the skin, consult a doctor immediately.
- Do not use the needles if the cap or foil of the needles is damaged.
Special instructions for doses above 30 micrograms per day
If the dose is above 30 micrograms per day:
- Administer two injections, one after the other, at separate injection sites (see the table with the recommended schedule in section 3 of the package leaflet).
- It is recommended to use a different Yorvipath pen for the second daily injection, even if both pens have the same colored button (same strength).
- Follow the steps in the instructions for use for each injection.
Pen handling
- Handle the pen with care.
- Keep the pen dry.
- Use a damp cloth to clean the pen.
- Do not drop or hit the pen against hard surfaces. If this happens, recheck the pen flow (section 2, steps A–C) before the next use.
- Do not apply excessive force to your pen. It may be empty, damaged, or may no longer function properly.
- Do not attempt to repair a damaged pen yourself. Never use a damaged pen.
Troubleshooting
1. How often should I test the flow of the pen?
To avoid wasting medicine, you should test the flow of the pen (paragraph 2) only the first time you use a new pen (or if you think it may be damaged). The flow test verifies that the medicine flows properly through the pen to deliver the correct doses of medicine.
2. I do not see drops after testing the flow from the pen 5 times. What should I do?
If you do not see a drop at the needle tip after 5 attempts, there may be no flow through the pen and needle.
Replace the needle (see section 5, step 13) and test the pen flow again (see section 2, steps A–C). The flow will be working properly when you see the drop of medicine.
If it still does not work, dispose of the pen and contact your doctor.
3. How can I tell that the injection has been completed?
The injection is complete only after you have fully pressed the button, the dose selector has returned to "●", and you have kept the needle in the skin for 5 seconds.
4. Why do I need to keep the pen in the skin for 5 seconds?
Some of the medicine may flow back into the pen or leak out from the injection site and remain
on the skin. Keeping the pen in the skin for 5 seconds helps ensure that the entire dose of medicine is
injected.
5. I cannot set the dose selector to the required dose. What should I do?
The pen does not allow you to set a dose higher than the amount of medicine remaining in the pen.
If your dose is greater than the amount of medicine left in the pen, you will not be able to
set a complete dose. You must discard the pen and administer the full dose using a new pen.
- The red protective device covers the needle before starting the injection. What should I do?
Unscrew and discard the used needle (see section 5, step 13). Take a new needle from the box and
restart from step 1. Each box contains one extra needle.
Description of components
Figure A
Symbols:
Droplets Doses (15, 18 or 21 micrograms) End of dose


Button
Dose selector
Pen cap Inspection window Pen Label
Dose window
pen inspection window
Protective
device
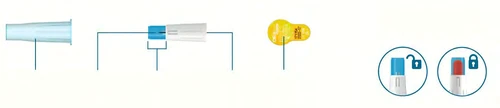
of the single-use needle:
Needle cap Needle tip Blue collar Needle Flange
of the needle of the needle
Note: there is no medicine inside the needle.
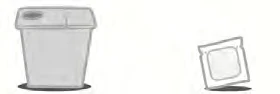
You will also need
Figure B
1 Prepare the pen and needle
Step 1 Figure C
Take your Yorvipath pen. Check that

it is the correct strength and check the expiry
date. Take a needle and check the expiry
Expiry date
date on the needle (figure C).
OK?
Note: remove the pen from the
refrigerator 20 minutes before first
use.
Step 2
Figure D
Medicine
Remove the pen cap and check the
inspection window to ensure that the OK?
medicine inside the pen is clear and
colourless (figure D).
Important: if the medicine contains
visible particles, do not use the pen, but
take a new one.
Step 3
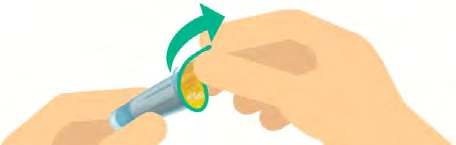
Figure E
Remove the flange from the needle (figure E).
This needle can only be used once,
and once used, it locks.
Always use a new needle for each
injection.
Step 4
Figure F
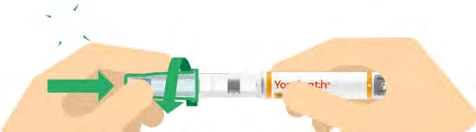
Attach the needle straight onto the pen, then
screw it onto the pen until secure (it will not
tighten completely) (figure F).
Step 5 Figure G
Remove the needle cap (figure G) and
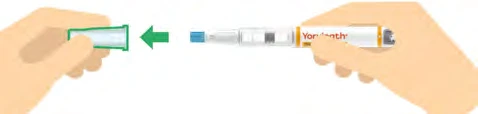
dispose of it.
Important: do not touch the blue collar as this could lock the needle.
2 For a new pen, check the flow
Day
Check the pen flow (steps A–C) only the first time you
use a new pen.
If the pen is already in use, go to section 3 "Prepare the injection and
select the dose".
Step A
Figure H
Turn the dose selector clockwise
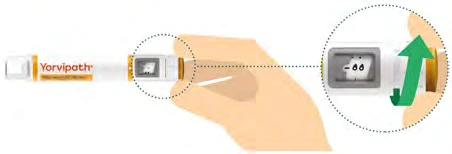
(to the right) until you hear 2 clicks, until you
see the droplet symbol “ ” in the
dose window (figure H).
Note: you can always correct the
selection by rotating the dose selector.
Step B
Figure I

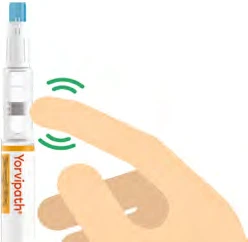
Tap the inspection window to bring any
air bubbles to the top of the pen (figure I). Hold the pen with the
needle tip pointing upwards.
Note: it is acceptable if there are small air bubbles.
Step C
Figure J
Press the button and watch for drops of
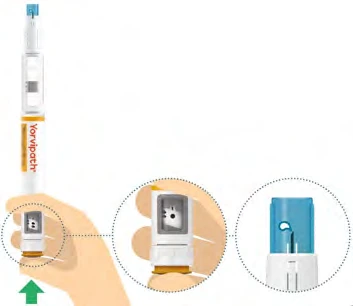
medicine to appear at the needle tip.
When pressing, ensure that the
dose selector rotates back to the
symbol “●” (figure J).
Important: if you do not see drops of
medicine, repeat this test (steps A–C) up to 5 times. If you still do not see drops, change the needle and repeat the test.
3 Prepare the injection and select the dose
Step 6
Figure K
Front
Abdomen
Choose the injection site. There are two
areas of the body where you can give the
injection (figure K). at least 5 cm
away from the
navel
Avoid injecting where the skin is
Front of thighs
red, swollen, or scarred.
Choose a different injection site each
time you inject.
Step 7
Figure L
Use an alcohol wipe
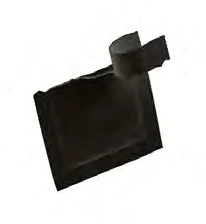
Wash your hands and clean the injection site soaked in alcohol
with an alcohol wipe (figure L).
Step 8
Figure M
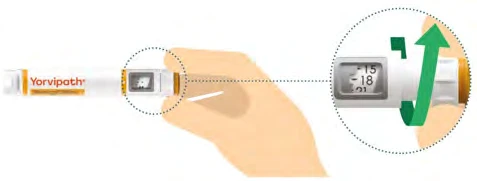
Select the dose prescribed by your doctor
( 15, 18 or 21 micrograms) by turning the
dose selector clockwise (to the right)
(figure M).
Important: make sure not to press the
button while selecting the dose to avoid wasting medicine.
Note: always discard the pen and use another one if you cannot set a
complete dose.
4 Inject the dose
Use the injection technique recommended by your doctor or
nurse. Read the entire section (steps 9–12) before
starting the injection.
Step 9 Figure N
Hold the pen so that the blue collar is
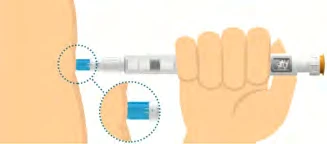
positioned on the injection site. Make sure
you can see the dose window
(figure N).
Step 10
Figure O
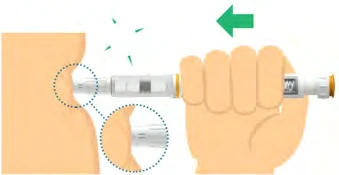
Push the pen straight onto the skin until you
hear a click and the blue collar is no longer visible
(figure O).
Step 11
Figure P
Press…

Press the button fully and keep it
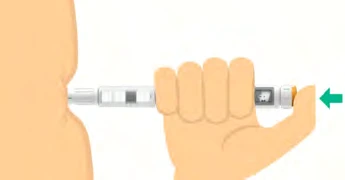
pressed for 5 seconds. Ensure that the keep
dose selector rotates back to the pressed
symbol “●”. This means that the
5 seconds
full dose has been delivered (figure P).
Step 12 Figure Q
Slowly remove the pen from the injection
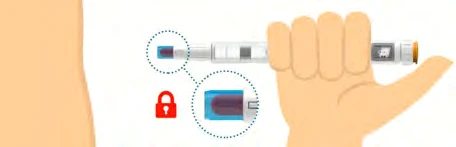
site. The blue collar will automatically lock
around the needle and a red lock symbol will appear (figure Q).
5 Dispose of the used needle
Step 13 Figure R
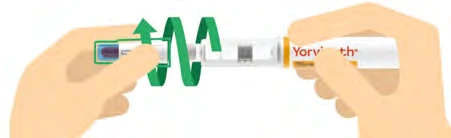
Unscrew the needle and dispose of it safely in
accordance with local regulations (figure R).
Do not attempt to re-cap the needle,
as you may get pricked from the back end.
Step 14
Figure S
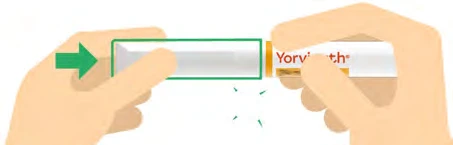
Securely replace the pen cap on the pen to protect it between injections and to protect the medicine from light (figure S).
6 Dispose of the used pen
Day
Important: always dispose of the
Figure T
pen 14 days after first use, according to
local regulations. It is recommended to
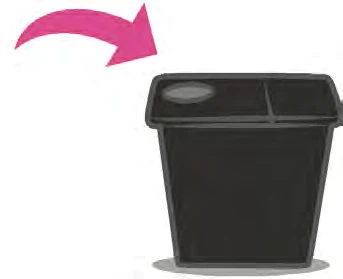

fill in the 'Opening date' field on the
inner packaging to keep track of when
14 days have passed.
Always dispose of the pen and any
additional needles after 14 days of use,
even if there is still medicine in the pen
(figure T). This is important to ensure you
fully benefit from the medicine.
INSTRUCTIONS FOR USE
Yorvipath
420 micrograms/1.4 mL
For doses of 24, 27 or 30 micrograms only
Injectable solution in a pre-filled pen
palopegteriparatide
For subcutaneous use
These instructions for use contain
information on how to inject
Yorvipath
Additional information
If you do not understand or are unable to complete any step described in these instructions for use,
please consult your doctor or nurse.
Important information to know before using the Yorvipath pen
Read and carefully follow the package leaflet and these instructions for use to correctly administer the injection
Yorvipath used correctly
Make sure you have received training from your doctor or nurse before injecting. This is
important to ensure you receive the correct treatment.
For correct use
- If you do not follow these instructions, you may not receive the correct dose and therefore may not get the full benefit of the medicine.
- If you are blind or have low vision, or if you have difficulty concentrating, do not use the pen without help. Instead, ask for help from a person trained in the use of the Yorvipath pen.
- Keep out of the sight and reach of children.
- The pen and needles are for use by a single patient only.
- Do not share the pen or needles with other people, as this could lead to infection (cross-contamination).
- Always dispose of the pen after 14 days of use, even if medicine remains in it. This is important to ensure you get the full benefit of the medicine.
- Always use the needles supplied with the Yorvipath pen for your injections.
- Remove the needle after each use. Do not store the pen with the needle attached.
- Avoid bending or breaking the pen needle.
- Do not change the injection angle once the needle has been inserted into the skin. Changing the angle may cause the needle to bend or break. A bent or broken needle may become trapped in the body or remain completely under the skin. If a broken needle becomes stuck in the body or remains under the skin, consult a doctor immediately.
- Do not use the needles if the cap or foil of the needles is damaged.
Special instructions for doses higher than 30 micrograms per day
If the dose is higher than 30 micrograms per day:
- Administer two injections, one after the other, at separate injection sites (see the table with the recommended schedule in section 3 of the package leaflet).
- It is recommended to use a different Yorvipath pen for the second daily injection, even if both pens have the same colored button (same strength).
- Follow the steps in the instructions for use for each injection.
Pen handling
- Handle the pen carefully.
- Keep the pen dry.
- Use a damp cloth to clean the pen.
- Do not drop or knock the pen against hard surfaces. If this happens, recheck the pen flow (section 2, steps A–C) before the next use.
- Do not apply excessive force to your pen. It may be empty, damaged, or no longer function properly.
- Do not attempt to repair a damaged pen yourself.
- Never use a damaged pen.
Troubleshooting
1. How often should I test the pen flow?
To avoid wasting medicine, you should test the pen flow (section 2) only the first time you use a new pen (or if you think it may be damaged). The test ensures that the medicine flows properly through the pen so that the correct doses of medicine are delivered.
2. I do not see drops after testing the flow of the pen 5 times. What should I do?
If you do not see a drop at the needle tip after 5 attempts, there may be no flow through the pen and needle.
Replace the needle (see section 5, step 13) and test the flow of the pen again (see section 2, steps A–C). The flow will be working correctly when you see the drop of medicine.
If it still does not work, dispose of the pen and contact your doctor.
3. How can I tell that I have completed the injection?
The injection is complete only after you have pressed the button fully down, the dose selector has
returned to "●", and you have kept the needle in the skin for 5 seconds.
4. Why do I need to keep the pen in the skin for 5 seconds?
Some of the medication may flow back into the pen or leak out from the injection site and remain
on the skin. Keeping the pen in the skin for 5 seconds helps ensure that the entire dose of medication is
injected.
5. I cannot set the dose selector to the required dose. What should I do?
The pen does not allow you to set a dose higher than the amount remaining in the pen.
If your dose is greater than the amount of medicine left in the pen, you will not be able to
set a complete dose. You must discard the pen and administer the full dose using a new pen.
- The red needle protection device covers the needle before starting the injection. What should I do?
Unscrew and discard the used needle (see section 5, step 13). Take a new needle from the box and
restart from step 1. Each box contains one extra needle.
Description of components
Figure A
Symbols:
Droplets Doses (24, 27 or 30 micrograms) End of dose



Button

Dose selector
Pen cap Dose window Pen Inspection window

Needle protection device
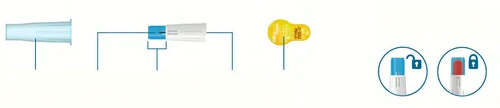
Single-use needle shield:
Needle cap Needle tip Blue flange Needle Lamina
Note: there is no medicine inside the needle.
You will also need
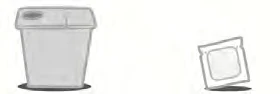
Figure B
1 Prepare the pen and needle
Step 1
Figure C
Take your Yorvipath pen. Check that

it is the correct strength and verify the Expiry date. Take a needle and check the Expiry date on the needle (Figure C). Expiry date
Note: remove the pen from the OK?
refrigerator 20 minutes before first use.
Step 2 Figure D
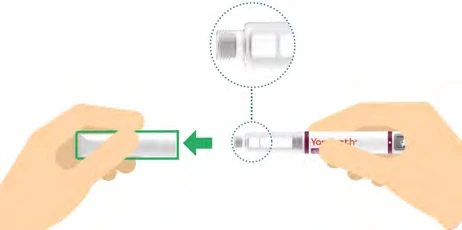
Remove the pen cap and check the inspection window to ensure that the Medicine
medicine inside the pen is clear and OK?
colourless (Figure D).
Important: if the medicine contains visible particles, do not use the pen, but take a new one.
Step 3 Figure E
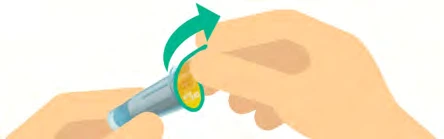
Remove the lamina from the needle (see Figure E).
This needle can only be used once, and once used it will lock.
Always use a new needle for each injection.
Step 4 Figure F
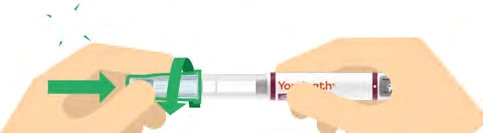
Attach the needle straight onto the pen, then screw it onto the pen until secure (it will not tighten completely) (Figure F).
Step 5 Figure G
Remove the needle cap (Figure G) and
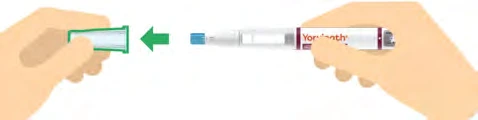
dispose of it.
Important: do not touch the blue flange as this may lock the needle.
2 Check flow when using a new pen
Day
Check the pen flow (steps A–C) only the first time you use a new pen.
If the pen is already in use, go to section 3 "Prepare injection and select dose".
Step A
Figure H
Rotate the dose selector clockwise
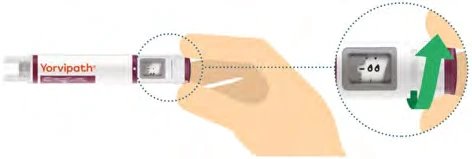
(to the right) until you hear 2 clicks, until you see the droplet symbol “ ” in the dose window (Figure H).
Note: you can always correct the selection by rotating the dose selector.
Step B
Figure I
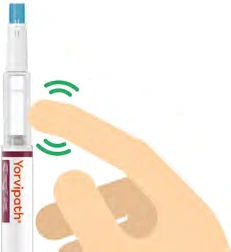
Allow any air bubbles to rise to the top of the pen by gently tapping the inspection window (Figure I). Hold the pen with the needle tip pointing upwards.
Note: small air bubbles are acceptable.
Step C Figure J
Press the button and watch for medicine
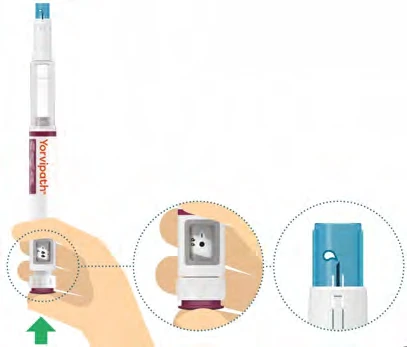
droplets to come out of the needle tip.
When pressing, ensure that the dose selector rotates back to the symbol “●” (Figure J).
Important: if you do not see medicine droplets, repeat this test (steps A–C) up to 5 times. If you still do not see droplets, change the needle and repeat the test.
3 Prepare injection and select dose
Step 6
Figure K
Front
Choose the injection site. There are two Abdomen
areas of the body where you can give the injection, at least 5 cm away from the navel (Figure K).
Avoid injecting where the skin is red, swollen, or scarred.
Front of thighs
Choose a different injection site each time you give an injection.
Step 7
Figure L
Use an alcohol
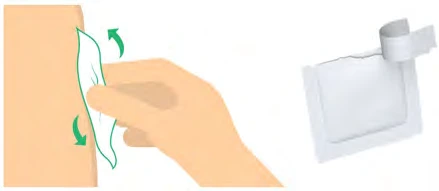
Wash your hands and clean the injection site with an alcohol-impregnated wipe (Figure L).
wipe
Step 8
Figure M
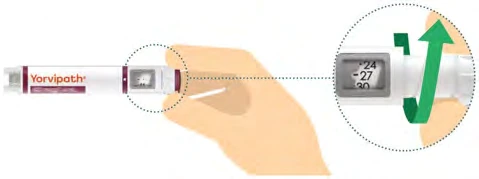
Select the dose prescribed by your doctor (24, 27 or 30 micrograms) by rotating the dose selector clockwise (to the right) (Figure M).
Important: make sure not to press the button while selecting the dose to avoid wasting medicine.
Note: always discard the pen and use a new one if you cannot set a complete dose.
4 Inject the dose
Use the injection technique recommended by your doctor or nurse. Read the entire section (steps 9–12) before starting the injection.
Step 9 Figure N
Hold the pen so that the blue flange is
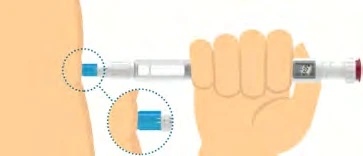
positioned on the injection site. Make sure you can see the dose window (Figure N).
Step 10 Figure O
Push the pen straight onto the skin until you
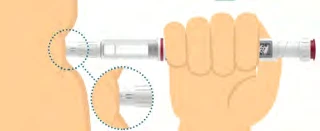
hear a click and the blue flange is no longer visible (Figure O).
Step 11 Figure P
Press…

Press the button fully and keep it
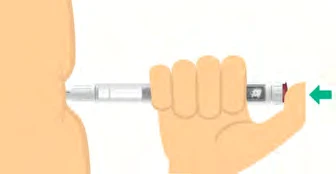
pressed for 5 seconds. Ensure that the selector rotates back to the symbol “●”. This means you have administered the full dose (Figure P).
Step 12 Figure Q
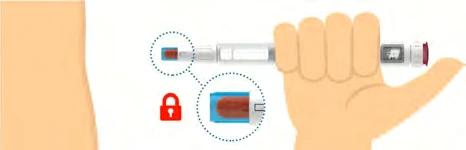
Slowly remove the pen from the injection site. The blue flange will automatically lock around the needle and a red lock symbol will appear (Figure Q).
5 Dispose of the used needle
Step 13
Figure R
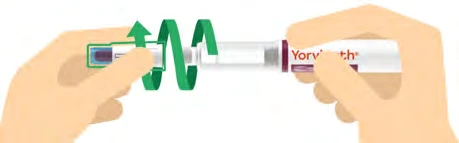
Unscrew the needle and dispose of it safely according to local regulations (Figure R).
Do not attempt to recap the needle, as you may get pricked from the back.
Step 14
Figure S
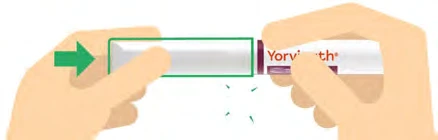
Securely attach the pen cap to the pen to protect it between injections and to protect the medicine from light (Figure S).
6 Dispose of the used pen Day
Figure T
Important: always dispose of the pen 14 days after first use

according to local regulations. It is recommended to fill in the 'Opening date:' field on the inner packaging to keep track of when 14 days have passed.
Always dispose of the pen and any unused needles after 14 days of use, even if medicine remains in the pen (Figure T). This is important to ensure you receive the full benefit of the medicine.
INSTRUCTIONS FOR USE
Yorvipath
168 micrograms/0.56 mL
For doses of 6, 9 or 12 micrograms only
Injectable solution in pre-filled pen
palopegteriparatide
For subcutaneous use
These instructions for use contain
information on how to inject
Yorvipath
Additional information
If you do not understand or are unable to complete any step described in these instructions for use,
please consult your doctor or nurse.
Important information to know before using the Yorvipath pen
Read and carefully follow the package leaflet and these instructions for use to correctly administer the injection
Using Yorvipath correctly
Make sure you have received training from your doctor or nurse before injecting. This is
important to ensure you receive the correct treatment.
For correct use
- If you do not follow these instructions, you may not receive the correct dose and therefore may not get the full benefit of the medicine.
- If you are blind or have low vision, or if you have difficulty concentrating, do not use the pen without help. Instead, ask for assistance from a person trained in using the Yorvipath pen.
- Keep out of the sight and reach of children.
- The pen and needles are for use by a single patient only.
- Do not share the pen or needles with other people, as this could lead to infection (cross-contamination).
- Always dispose of the pen after 14 days of use, even if it still contains medicine. This is important to ensure you get the full benefit of the medicine.
- Always use the needles supplied with the Yorvipath pen for your injections. If needles are not included, they must be obtained separately. Needles with a length of 5 mm and gauge 31 should be used. Consult your doctor or nurse to determine the most suitable needle for you.
- Instructions on how to handle needles do not replace the instructions provided with needles obtained separately.
- Remove the needle after each use. Do not store the pen with the needle attached.
- Avoid bending or breaking the pen needle.
- Do not change the injection angle once the needle has been inserted into the skin. Changing the angle may cause the needle to bend or break. A bent or broken needle may become lodged in the body or remain completely under the skin. If a broken needle becomes stuck in the body or remains under the skin, consult a doctor immediately.
- Do not use needles if the cap or foil of the needles is damaged.
Handling the pen
- Handle the pen with care.
- Keep the pen dry.
- Use a damp cloth to clean the pen.
- Do not drop or knock the pen against hard surfaces. If this happens, recheck the pen flow (Section 2, steps A–C) before the next use.
- Do not apply excessive force to the pen. It may be empty, damaged, or may no longer function properly.
- Do not attempt to repair a damaged pen yourself.
- Never use a damaged pen.
Troubleshooting
1. How often should I test the pen flow?
To avoid wasting medicine, you should test the pen flow (paragraph 2) only the first time
you use a new pen (or if you think it may be damaged). The test verifies that the
medicine flows properly through the pen so that it delivers the correct doses of medicine.
2. I don't see any drops after testing the flow of the pen 5 times. What should I do?
If you do not see a drop at the tip of the needle after 5 attempts, there may be no flow through the pen and needle.
Replace the needle (see section 5, step 12) and test the flow of the pen again (see section 2, steps A–C). The flow will work properly when you see the drop of medicine.
If it still does not work, dispose of the pen and contact your doctor.
3. How do I know when the injection is complete?
The injection is complete only after you have pressed the button fully down, the dose selector has returned to "●", and you have kept the needle in the skin for 5 seconds.
4. Why do I need to keep the pen in the skin for 5 seconds?
Some of the medicine may flow back into the pen or leak out from the injection site and remain
on the skin. Keeping the pen in the skin for 5 seconds helps ensure that all of the medicine is
injected.
5. I cannot set the dose selector to the required dose. What should I do?
The pen does not allow you to set a dose higher than the amount of medicine remaining in the pen.
If your dose is greater than the amount of medicine left in the pen, you will not be able to
set a complete dose. You must discard the pen and take your full dose of medicine using a new pen.
Description of components
Figure A
Symbols:
Droplets End of dose
Doses (6, 9 or 12 micrograms)
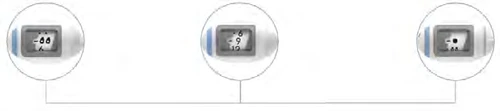

Button

Dose selector
Pen cap Inspection window Pen Label of the
Dose window
pen
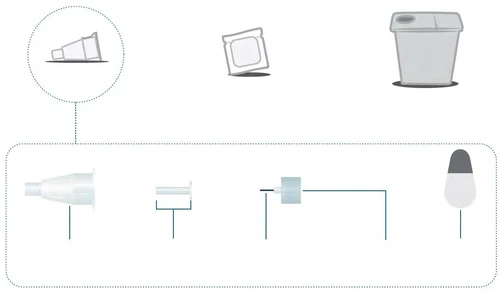
Needle
Needle cover Inner shield Needle tip Needle Flange
of needle of needle
1 Prepare the pen and needle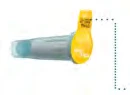 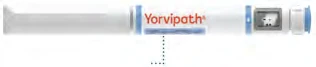  | |
| Step 1 Take your Yorvipath pen. Check that it is the correct strength and verify the expiration date. Take a needle and check the expiration date on the needle (Figure C). Note: Remove the pen from the refrigerator 20 minutes before first use. | Expiration date OK? Figure C |
| Step 2 Remove the pen cap and check the inspection window to ensure that the medicine inside the pen is clear and colorless (Figure D). Important: If the medicine contains visible particles, do not use the pen; instead, take a new one. | Medicine OK? Figure D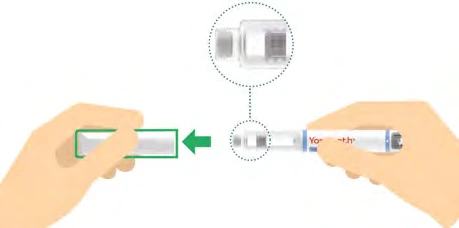 |
| Step 3 Remove the tab from the needle (Figure E). This needle can only be used once. Always use a new needle for each injection. | Figure E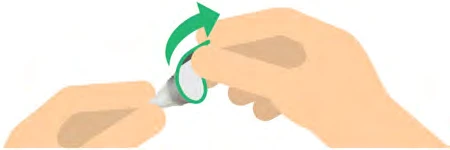 |
| Step 4 Attach the needle straight onto the pen, then screw it on until firmly secured (Figure F). | Figure F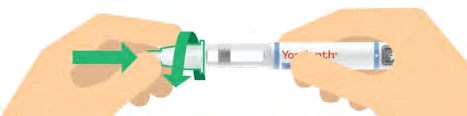 |
| Step 5 Remove the outer needle cap and the inner needle shield (Figure G). Dispose of the inner needle shield and keep the outer needle cap for later use. | Figure G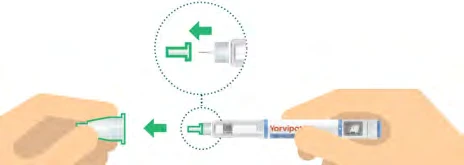 |
2 If using a new pen, check the flow
Day
Check the pen flow (steps A – C) only the first time you use a new pen.
If the pen is already in use, go to section 3 "Prepare the injection and select the dose".
Step A
Figure H
Rotate the dose selector clockwise
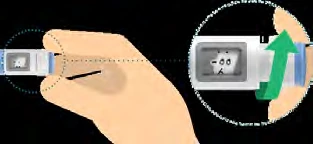
(to the right) until you hear 2 clicks, until
you see the droplet symbol “ ” in the
dose window (Figure H).
Note: You can always correct the
selection by rotating the dose selector.
Step B
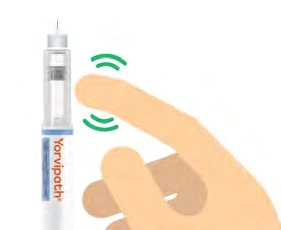

Figure I
Tap the inspection window gently to move
any air bubbles to the top of the pen
(Figure I). Hold the pen with the needle
pointing upwards.
Note: It is acceptable if small air bubbles are present.
Step C
Figure J
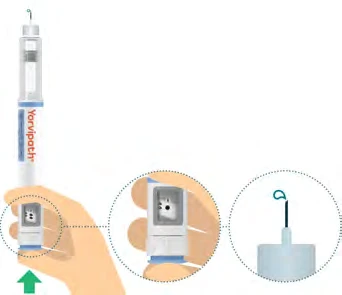
Press the button and watch for drops of
medication to appear at the needle tip.
When pressing, ensure that the dose selector
rotates back to the symbol “●” (Figure J).
Important: If you do not see medication drops, repeat this test (steps A – C) up to 5 times. If you still do not see drops, replace the needle and repeat the test.
3 Prepare the injection and select the dose
Step 6
Figure K
Front
Choose the injection site. There are two
areas of the body where you can give the
injection (Figure K).
Front of thighs
Abdomen
Give injections at least 5 cm away from
the navel.
Avoid injecting where the skin is red,
swollen, or scarred.
Choose a different injection site each time
you give an injection.
Step 7
Figure L
Use an alcohol wipe
Wash your hands and clean the injection site
with an alcohol wipe (Figure L).
Step 8
Figure M
Select the dose prescribed by your doctor
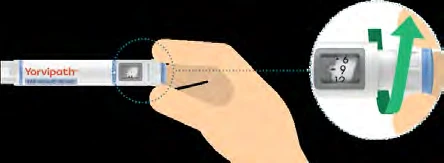
( 6, 9 or 12 micrograms) by rotating the dose
selector clockwise (to the right) (Figure M).
Important: Make sure you do not press the
button while selecting the dose, to avoid
wasting medication.
Note: Always dispose of the pen and use a
new one if you are unable to set a full dose.
4 Inject the dose
Use the injection technique recommended by your doctor or nurse. Read the entire section (steps 9 – 11) before starting the injection.
Step 9
Figure N
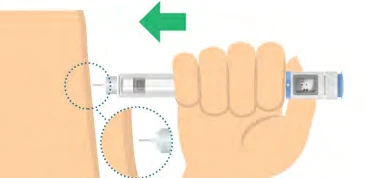
Ensure you can see the dose window. Insert
the needle into the skin (Figure N).
Step 10
Figure O
Press…
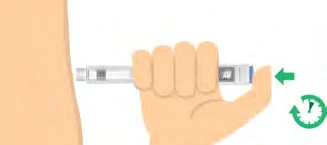
Press the button fully and then keep it
pressed
pressed for 5 seconds. Ensure that the
5 seconds
dose selector rotates back to the symbol “●”.
This means you have delivered the full dose
(Figure O).
Step 11
Figure P
Remove the pen slowly from the injection site
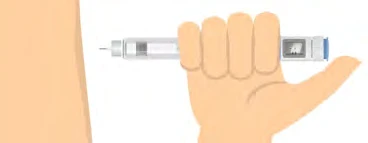
(Figure P).
5 Dispose of the used needle
Step 12
Figure Q
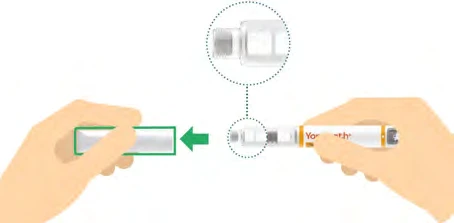
Lift the needle cap to carefully remove the
needle. Insert the needle tip into the needle
cap and secure the cap onto the needle
(Figure Q).
Important: Always attach the needle cap
before removing the needle to reduce the
risk of needlestick injury and cross-contamination.
Step 13
Figure R
Unscrew the needle and dispose of it safely
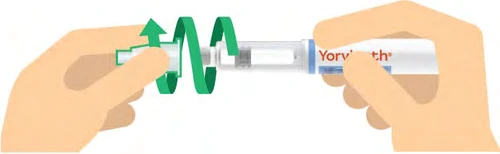
according to local regulations (Figure R).
Step 14 Figure S
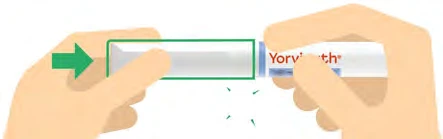
Firmly attach the pen cap to the pen to
protect it between injections and to protect
the medication from light (Figure S).
6 Dispose of the used pen
Day
Important: Always dispose of the pen
Figure T
14 days after first use, according to local
regulations. It is recommended to fill in the
"Date opened:" field on the packaging to keep
track of when 14 days have passed.
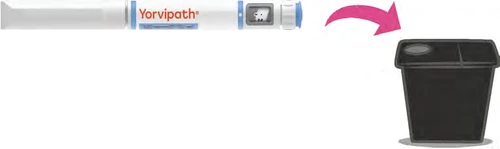
Always dispose of the pen after 14 days of use,
even if there is still medication remaining in the pen (Figure T). This is important to ensure you receive the full benefit of the medication.
If additional needles are included in the package with the pen, remember to dispose of any unused extra needles when you dispose of the pen.
INSTRUCTIONS FOR USE
Yorvipath
294 micrograms/0.98 mL
For doses of 15, 18, or 21 micrograms only
Prefilled pen injection solution
palopegteriparatide
For subcutaneous use
These instructions for use contain
information on how to inject
Yorvipath
Additional information
If you do not understand or are unable to complete any of the steps described in these instructions for use,
please consult your doctor or nurse.
Important information to know before using the Yorvipath pen
Read and carefully follow the package leaflet and these instructions for use to correctly administer the injection
Yorvipath used correctly
Make sure you have received training from your doctor or nurse before injecting. This is
important to ensure you receive the correct treatment.
For correct use
- If you do not follow these instructions, you may not receive the correct dose and therefore may not get the full benefit of the medicine.
- If you are blind or have low vision, or if you have difficulty concentrating, do not use the pen without help. Instead, ask for help from a person trained in using the Yorvipath pen.
- Keep out of the sight and reach of children.
- The pen and needles are for use by only one patient.
- Do not share the pen or needles with other people, as this could lead to infection (cross-contamination).
- Always dispose of the pen after 14 days of use, even if it still contains medicine. This is important to ensure you get the full benefit of the medicine.
- Always use the needles provided with the Yorvipath pen for your injections. If needles are not included, they must be obtained separately. Needles with a length of 5 mm and gauge 31 should be used. Ask your doctor or nurse which needle is most suitable for you.
- The instructions on how to handle the needles do not replace the instructions provided with separately obtained needles.
- Remove the needle after each use. Do not store the pen with the needle attached.
- Avoid bending or breaking the pen needle.
- Do not change the injection angle once the needle has been inserted into the skin. Changing the angle may cause the needle to bend or break. A bent or broken needle may become trapped in the body or remain completely under the skin. If a broken needle becomes stuck in the body or remains under the skin, consult a doctor immediately.
- Do not use the needles if the needle cap or foil is damaged.
Special instructions for doses above 30 micrograms per day
If the dose is above 30 micrograms per day:
- Administer two injections, one after the other, at separate injection sites (see the recommended schedule table in section 3 of the package leaflet).
- It is recommended to use a different Yorvipath pen for the second daily injection, even if both pens have the same colored button (same strength).
- Follow the steps in the instructions for use for each injection.
Pen handling
- Handle the pen with care.
- Keep the pen dry.
- Use a damp cloth to clean the pen.
- Do not drop or knock the pen against hard surfaces. If this happens, recheck the pen flow (section 2, steps A–C) before next use.
- Do not apply excessive force to your pen. It may be empty, damaged, or no longer function properly.
- Do not attempt to repair a damaged pen yourself. Never use a damaged pen.
Troubleshooting
1. How often should I test the pen flow?
To avoid wasting medicine, you should test the pen flow (paragraph 2) only the first time you use a new pen (or if you think it may be damaged). The flow test ensures that the medicine flows properly through the pen, so that it delivers the correct doses of medicine.
2. I don't see drops after testing the pen flow 5 times. What should I do?
If you do not see a drop at the tip of the needle after 5 attempts, there may be no flow through the pen and needle.
Replace the needle (see section 5, step 12) and test the pen flow again (see section 2, steps A–C). The flow will be working properly when you see the drop of medicine.
If it still does not work, dispose of the pen and contact your doctor.
3. How do I know when the injection is complete?
The injection is complete only after you have pressed the button fully down, the dose selector has returned to "●", and you have kept the needle in the skin for 5 seconds.
4. Why do I need to keep the pen in the skin for 5 seconds?
Some medication may flow back into the pen or leak out from the injection site and remain
on the skin. Keeping the pen in the skin for 5 seconds helps ensure that the entire dose of medication is
injected.
5. I cannot set the dose selector to the required dose. What should I do?
The pen does not allow you to set a dose higher than the amount of medicine remaining in the pen.
If your dose is greater than the amount of medicine left in the pen, you will not be able to
set the full dose. You must discard the pen and take your complete dose using a new pen.
Description of components
Figure A
Symbols:
Drops Doses (15, 18 or 21 micrograms) End of dose


Button
Dose selector
Pen cap Inspection window Pen body Label
Dose window
of the pen
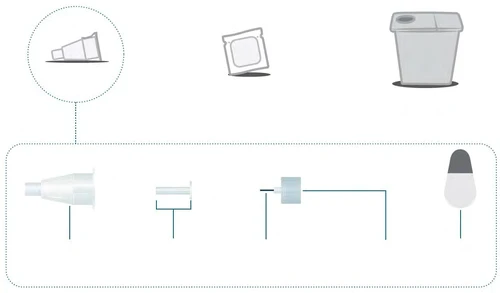
Needle
Outer cover Inner shield Needle tip Needle Blade
of the needle of the needle
1 Prepare the pen and needle | |
| Step 1 Take the Yorvipath pen. Check that it is the correct strength and verify the expiration date. Take a needle and check the expiration date on the needle packaging (Figure C). Note: Remove the pen from the refrigerator 20 minutes before first use. | Figure C Expiration date OK? |
| Step 2 Remove the pen cap and check the inspection window to ensure that the medicine inside the pen is clear and colorless (Figure D). Important: If the medicine contains visible particles, do not use the pen; instead, take a new one. | Medicine OK? Figure D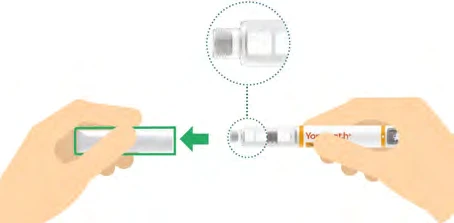 |
| Step 3 Remove the tab from the needle (Figure E). This needle may be used only once. Always use a new needle for each injection. | Figure E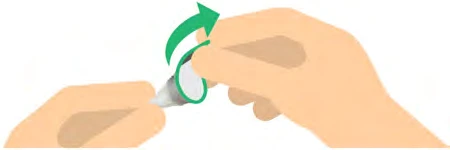 |
| Step 4 Attach the needle straight onto the pen, then screw it on until firmly secured (Figure F). | Figure F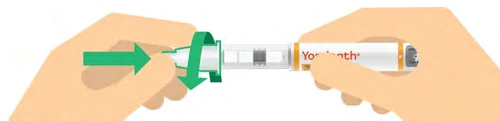 |
| Step 5 Remove the outer needle cap and the inner needle shield (Figure G). Dispose of the inner needle shield and keep the outer needle cap for later use. | Figure G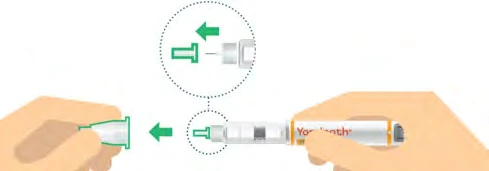 |
2 If using a new pen, check its flow
Day
Check the pen flow (steps A – C) only the first time you use a new pen.
If the pen is already in use, go to section 3 "Prepare the injection and select the dose".
Step A
Figure H
Rotate the dose selector clockwise
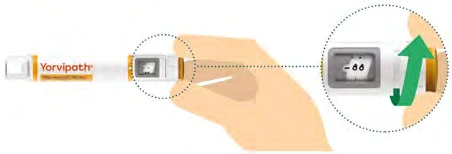
(to the right) until you hear 2 clicks, until
you see the droplet symbol “ ”
in the dose window (figure H).
Note: you can always correct the
selection by rotating the dose selector.
Step B
Figure I
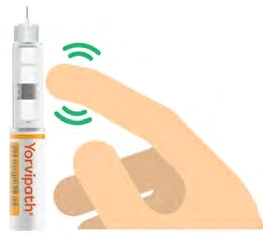
Tap the inspection window gently to bring
any air bubbles to the top of the pen
(figure I). Hold the pen with the needle tip
pointing upwards.
Note: it is acceptable if there are small air
bubbles.
Step C
Figure J
Press the button and watch for drops of
medicinal product to come out from the
needle tip.
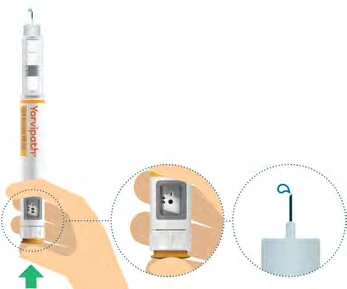
While pressing, make sure the dose selector
rotates again to the “●” symbol (figure J).
Important: if you do not see any drops of
medicinal product, repeat this test (steps A–C) up to 5 times. If you still do not see any drops, change the needle and repeat the test.
3 Prepare the injection and select the dose
Step 6
Figure K
Injection site
Choose the injection site. There are two
areas of the body where you can administer
the injection (figure K).
Abdomen (belly)
at least 5 cm
away from the
navel
Avoid injecting where the skin is red,
swollen, or scarred.
Front of the thighs
Always choose a different injection site each
time you give an injection.
Step 7
Figure L
Use an alcohol swab
Wash your hands and clean the injection
site with an alcohol-impregnated swab
(figure L).
Step 8
Figure M
Select the dose prescribed by your doctor
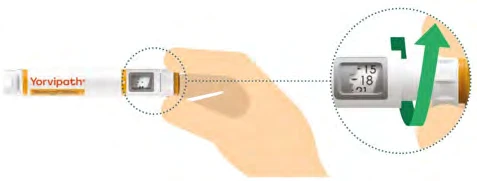
( 15, 18 or 21 micrograms) by rotating the
dose selector clockwise (to the right)
(figure M).
Important: make sure not to press the
button while selecting the dose, to avoid
wasting the medicinal product.
Note: always dispose of the pen and use a
new one if you are unable to set a full dose.
4 Inject the dose
Use the injection technique recommended by your doctor or nurse. Read the entire section (steps 9–11) before starting the injection.
Step 9 Figure N
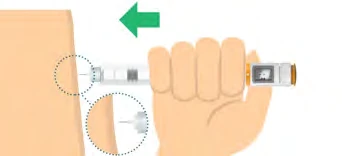
Make sure you can see the dose window. Insert the needle into the skin (figure N).
Step 10
Figure O
Press…
Press the button fully and keep it
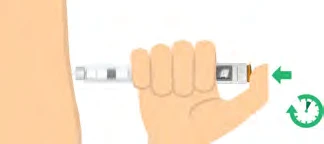
pressed, then keep it pressed for 5 seconds. Make sure the dose selector rotates again to the “●” symbol. This indicates that the full dose has been delivered (figure O).
5 seconds

Step 11 Figure P
Remove the pen slowly from the injection site
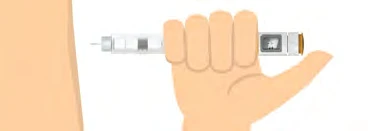
(figure P).
5 Dispose of the used needle
Step 12
Figure Q
Replace the needle cap to carefully remove
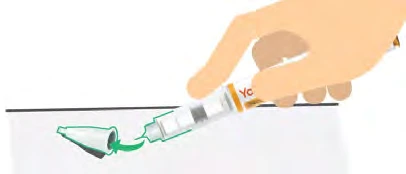
the needle. Place the needle tip into the needle cap and secure the cap onto the needle (figure Q).
Important: always attach the needle cap before removing the needle to reduce the risk of needlestick injury and cross-contamination.
Step 13 Figure R
Unscrew the needle and dispose of it safely
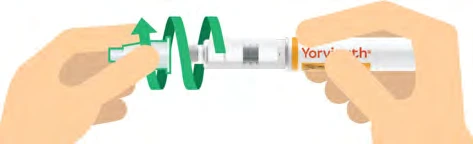
in accordance with local regulations (figure R).
Step 14
Figure S
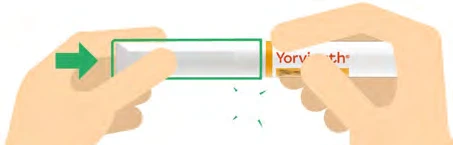
Securely attach the pen cap onto the pen to protect it between injections and to protect the medicinal product from light (figure S).
6 Dispose of the used pen
Day
Important: always dispose of the pen
Figure T
14 days after first use, in accordance with
local regulations. It is recommended to fill in
the 'Date opened:' field on the outer carton
to keep track of when 14 days have passed.
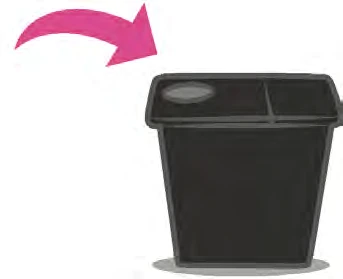

Always dispose of the pen and any additional needles after 14 days of use, even if there is still medicinal product remaining in the pen (figure T). This is important to ensure you receive the full benefit of the medicine.
Note: if additional needles are included in the pen packaging, remember to dispose of them when you dispose of the pen.
INSTRUCTIONS FOR USE
Yorvipath
420 micrograms/1.4 mL
For doses of 24, 27 or 30 micrograms only
Prefilled pen injection solution
palopegteriparatide
For subcutaneous use
These instructions for use contain
information on how to inject
Yorvipath
Additional information
If you do not understand or are unable to complete any step described in these instructions for use, contact your doctor or nurse.
Important information to know before using the Yorvipath pen
Read and carefully follow the package leaflet and these instructions for use to correctly administer the injection
Using Yorvipath correctly
Make sure you have been trained by your doctor or nurse before injecting. This is
important to ensure you receive the correct treatment.
For correct use
- If you do not follow these instructions, you may not receive the correct dose and therefore may not get the full benefit from the medicine.
- If you are blind or visually impaired, or have difficulty concentrating, do not use the pen without help. Instead, ask a person trained in the use of the Yorvipath pen to assist you.
- Keep out of sight and reach of children.
- The pen and needles are for use by a single patient only.
- Do not share the pen or needles with other people, as this could lead to infection (cross-contamination).
- Always dispose of the pen after 14 days of use, even if it still contains medicine. This is important to ensure you receive the full benefit of the medicine.
- Always use the needles supplied with the Yorvipath pen for your injections. If needles are not included, they must be obtained separately. Needles with a length of 5 mm and gauge 31 should be used. Ask your doctor or nurse which needle is most suitable for you.
- The instructions on how to handle needles do not replace the instructions provided with separately obtained needles.
- Remove the needle after each use. Do not store the pen with the needle attached.
- Avoid bending or breaking the pen needle.
- Do not change the injection angle once the needle has been inserted into the skin. Changing the angle may cause the needle to bend or break. A bent or broken needle may become trapped in the body or remain completely under the skin. If a broken needle becomes stuck in the body or remains under the skin, consult a doctor immediately.
- Do not use needles if the cap or foil of the needles is damaged.
Special instructions for doses higher than 30 micrograms per day
If the dose is higher than 30 micrograms per day:
- Administer two injections, one after the other, at separate injection sites (see the table with the recommended schedule in section 3 of the package leaflet).
- It is recommended to use a different Yorvipath pen for the second daily injection, even if both pens have the same coloured button (same strength).
- Follow the steps in the instructions for use for each injection.
Pen handling
- Handle the pen with care.
- Keep the pen dry.
- Use a damp cloth to clean the pen.
- Do not drop or knock the pen against hard surfaces. If this happens, re-check the pen flow (section 2, steps A–C) before the next use.
- Do not apply excessive force to your pen. It may be empty, damaged, or may no longer function properly.
- Do not attempt to repair a damaged pen yourself.
- Never use a damaged pen.
Troubleshooting
1. How often should I test the pen flow?
To avoid wasting medicine, you should test the pen flow (paragraph 2) only the first time you use a new pen (or if you think it may be damaged). The test verifies that the medicine flows properly through the pen to ensure correct dosing.
2. I don't see drops after testing the flow from the pen 5 times. What should I do?
If you do not see a drop at the tip of the needle after 5 attempts, there may be no flow through the pen and needle.
Replace the needle (see section 5, step 12) and test the flow from the pen again (see section 2, steps A–C). The flow will be working correctly when you see the drop of medicine.
If it still does not work, dispose of the pen and contact your doctor.
3. How do I know when the injection is complete?
The injection is complete only after you have fully pressed the button, the dose selector has returned to "●", and you have kept the needle in the skin for 5 seconds.
4. Why must I keep the pen in the skin for 5 seconds?
Some of the medicine may flow back into the pen or leak out from the injection site and remain
on the skin. Keeping the pen in the skin for 5 seconds helps ensure that the entire dose of medicine is
injected.
5. I cannot set the dose selector to the required dose. What should I do?
The pen does not allow you to set a dose higher than the amount of medicine remaining in the pen.
If your dose is greater than the amount of medicine left in the pen, you will not be able to
set a complete dose. You must dispose of the pen and take your full dose of medicine using
a new pen.
Description of components
Figure A
Symbols:
Droplets Doses (24, 27 or 30 micrograms) End of dose


Button

Dose selector
Pen cap Inspection window Label
Dose window
of the pen of the pen
You will also need
Figure B
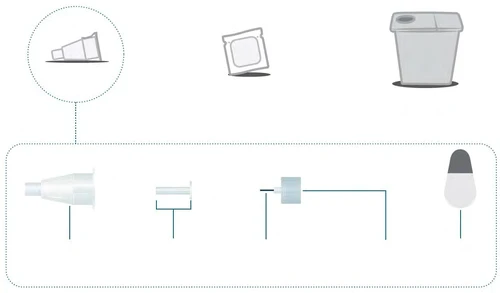
Needle
Needle cap Inner shield Needle tip Needle
of the needle blade
1 Prepare the pen and needle | |
| Step 1 Take your Yorvipath pen. Check that it is the correct strength and verify the expiration date. Take a needle and check the expiration date on the needle (Figure C). Note: Remove the pen from the refrigerator 20 minutes before first use. | Figure C Expiration date OK? |
| Step 2 Remove the pen cap and check the inspection window to ensure that the medicine inside the pen is clear and colourless (Figure D). Important: If the medicine contains visible particles, do not use the pen; instead, take a new one. | Figure D Medicine OK?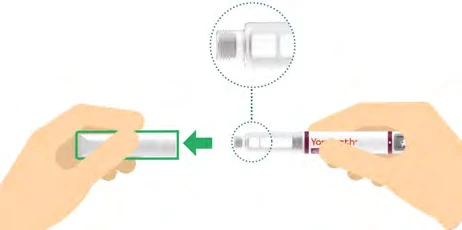 |
| Step 3 Remove the needle seal (see Figure E). This needle can only be used once. Always use a new needle for each injection. | Figure E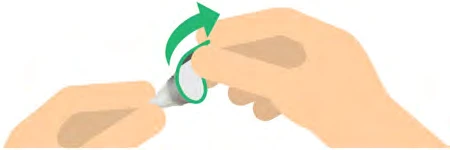 |
| Step 4 Attach the needle straight onto the pen, then screw it onto the pen until firmly secured (Figure F). | Figure F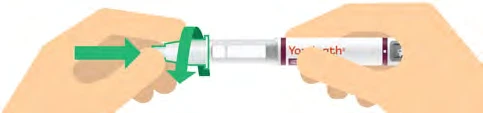 |
| Step 5 Remove the outer needle cap and the inner needle shield (Figure G). Dispose of the inner needle shield and keep the outer needle cap for later use. | Figure G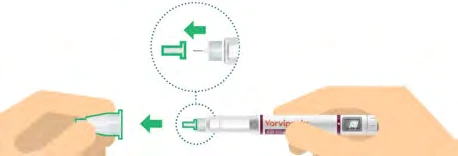 |
2 If using a new pen, check the flow
Day
Check the pen flow (steps A – C) only the first time you use a new pen.
If the pen is already in use, go to section 3 "Prepare the injection and select the dose".
Step A
Figure H
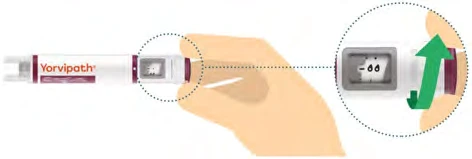
Rotate the dose selector clockwise
(to the right) until you hear 2 clicks, until you
see the droplet symbol “ ” in the
dose window (Figure H).
Note: You can always correct the
selection by rotating the dose selector.
Step B
Figure I
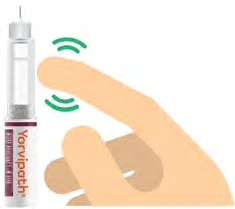
Remove any air bubbles by gently tapping
the inspection window (Figure I). Hold the pen
with the needle tip pointing upward.
Note: It is acceptable if small air bubbles are present.
Step C
Figure J
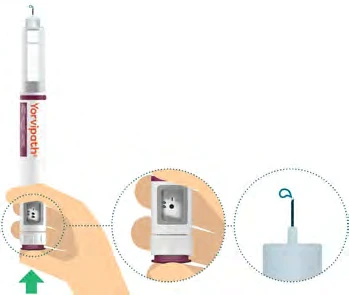
Press the button and watch for drops of
medicinal product to appear at the needle tip.
When pressing, ensure that the dose selector
rotates back to the “●” symbol (Figure J).
Important: If you do not see drops of
medicinal product, repeat this test
(steps A – C) up to 5 times. If you still do not see drops, change the needle and repeat the test.
3 Prepare the injection and select the dose
Step 6
Figure K
Front
Choose the injection site. There are two
areas of the body where you can give the
injection (Figure K).
Abdomen (tummy)
At least 5 centimetres
away from the navel
Avoid injecting where the skin is
Front of thighs
red, swollen, or scarred.
Choose a different injection site each
time you give an injection.
Step 7
Figure L
Use an alcohol
wipe
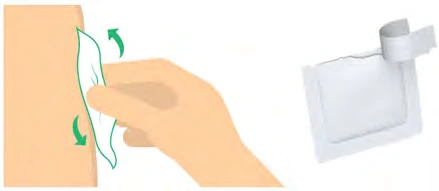
Wash your hands and clean the injection
site with an alcohol wipe (Figure L).
Step 8
Figure M
Select the dose prescribed by your doctor
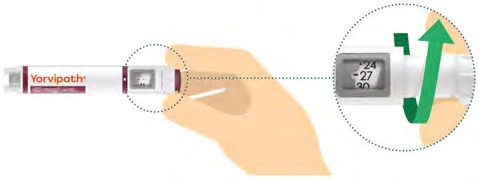
( 24, 27 or 30 micrograms) by rotating the
dose selector clockwise (to the right)
(Figure M).
Important: Make sure not to press the
button while selecting the dose, to avoid
wasting the medicinal product.
Note: Always dispose of the pen and use
a new one if you cannot set a full dose.
4 Inject the dose
Use the injection technique recommended by your doctor or nurse. Read the entire section (steps 9 – 11) before starting the injection.
Step 9 Figure N
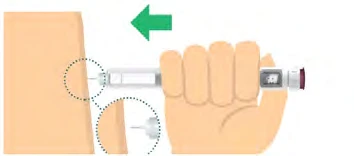
Ensure you can see the dose window. Insert
the needle into the skin (Figure N).
Step 10
Figure O
Press…

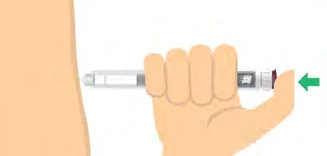
Press the button fully and keep it pressed for 5 seconds. Ensure that the dose selector rotates back to the “●” symbol. This indicates that you have administered the full dose (Figure O).
5 seconds

Step 11 Figure P
Remove the pen slowly from the injection site
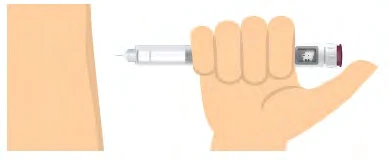
(Figure P).
5 Dispose of the used needle
Step 12
Figure Q
Replace the needle cap to safely remove
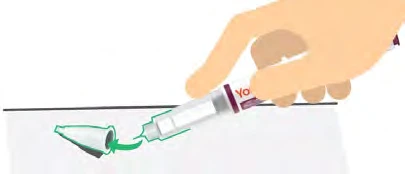
the needle. Insert the needle tip into the
needle cap and secure the cap onto the
needle (Figure Q).
Important: Always replace the needle cap
before removing the needle to reduce the
risk of needlestick injury and cross-contamination.
Step 13
Figure R
Unscrew the needle and dispose of it safely
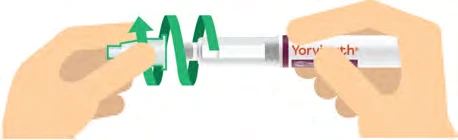
in accordance with local regulations
(Figure R).
Step 14
Figure S
Securely attach the pen cap to the pen
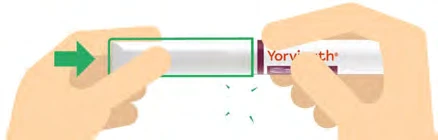
to protect it between injections and to
protect the medicinal product from light
(Figure S).
6 Dispose of the used pen Day
Important: Always dispose of the pen
Figure T
14 days after first use, in accordance with
local regulations. It is recommended to fill in
the 'Date opened:' field on the outer carton
to keep track of when 14 days have passed.

Always dispose of the pen and any unused
needles after 14 days of use, even if there is
still medicinal product remaining in the pen
(Figure T). This is important to ensure you
receive the full benefit of the medicine.
Note: If additional needles are included in
the pen packaging, remember to dispose of
them when you dispose of the pen.