Nexplanon
Italy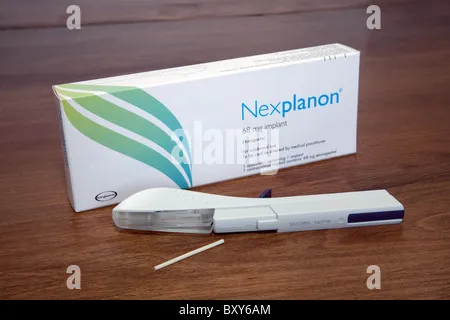
Table of Contents
- Package leaflet: Information for the user
- Nexplanon 68 mg implant for subcutaneous use
- 1. What is Nexplanon and what is it used for
- 2. What you should know before using Nexplanon
- 3. How to use Nexplanon
- 4. Possible side effects
- 5. How to store Nexplanon
- 6. Package contents and other information
- The following information is intended for healthcare professionals only:
- 7. Information for the healthcare provider
Package leaflet: Information for the user
Nexplanon 68 mg implant for subcutaneous use
etonogestrel
Please read all of this leaflet carefully before using this medicine because it contains important information for you.
- Keep this leaflet. You may need to read it again.
- If you have any questions, ask your doctor, pharmacist or nurse.
- If you get any side effects, including those not listed in this leaflet, tell your doctor, pharmacist or nurse. See section 4.
Your doctor will provide you with a Patient Alert Card containing important information you need to know. Keep the card in a safe place and show it to healthcare professionals during all visits related to the use of the implant.
Contents of this leaflet
- What Nexplanon is and what it is used for
- What you need to know before using Nexplanon
- How to use Nexplanon
- Possible side effects
- How to store Nexplanon
- Contents of the pack and other information
- Information for healthcare professionals
1. What is Nexplanon and what is it used for
Nexplanon is a preloaded contraceptive implant in a single-use applicator. Its safety and efficacy have been established in women aged between 18 and 40 years. The implant is a small, soft, flexible plastic rod, 4 cm in length and 2 mm in diameter, containing 68 milligrams of the active substance, etonogestrel. The applicator allows the healthcare provider to insert the implant just under the skin in the upper arm. Etonogestrel is a synthetic female hormone similar to progesterone. A small amount of etonogestrel is continuously released into the bloodstream. The implant is made of ethylene vinyl acetate copolymer, a plastic that does not dissolve in the body. The implant also contains a small amount of barium sulphate, which makes it visible on X-rays.
Nexplanon is used to prevent pregnancy.
How Nexplanon works
The implant is inserted just under the skin. The active substance, etonogestrel, works in two ways:
- it prevents the release of an egg from the ovaries;
- it causes changes in the cervix that make it difficult for sperm to enter the uterus.
As a result, Nexplanon protects against pregnancy for up to three years. However, if you are overweight, your doctor may advise you to replace the implant earlier than this. Nexplanon is one of many methods of pregnancy prevention. Another commonly used method of birth control is the combined oral contraceptive pill. Unlike the combined pill, Nexplanon can be used by women who cannot or do not wish to use oestrogens. With Nexplanon, there is no need to remember to take a daily pill. This is one of the reasons why Nexplanon is highly reliable (over 99% effective). In rare cases, if the implant is not correctly inserted or is not inserted at all, you may not be protected against pregnancy. During use of Nexplanon, menstrual bleeding may change and become absent, irregular, infrequent, frequent, prolonged, or rarely heavy. The bleeding pattern observed during the first three months generally gives an indication of future bleeding patterns. You may notice an improvement in painful menstruation.
You may stop using Nexplanon at any time (see also "If you want to stop using Nexplanon").
2. What you should know before using Nexplanon
Hormonal contraceptives, including Nexplanon, do not protect against HIV (AIDS) infection or any other sexually transmitted disease.
Do not use Nexplanon
Do not use Nexplanon if you have any of the conditions listed below. If any of these conditions apply to you, inform your doctor before Nexplanon is inserted. Your doctor may advise you to use a non-hormonal method of birth control.
- If you are allergic to etonogestrel or to any of the other ingredients of this medicine (listed in section 6).
- If you have thrombosis. Thrombosis is the formation of a blood clot in a blood vessel [for example in the legs (deep vein thrombosis) or in the lungs (pulmonary embolism)].
- If you have or have had jaundice (yellowing of the skin), a severe liver disease (when the liver does not function properly), or a liver tumour.
- If you have (or have had) or may have cancer of the breast or genital organs.
- If you have had vaginal bleeding of unknown origin.
If any of these conditions occurs for the first time while using Nexplanon, contact your doctor immediately.
Warnings and precautions
Talk to your doctor, pharmacist, or nurse before using Nexplanon.
If Nexplanon is used while any of the conditions listed below are present, you may need close monitoring. Your doctor will explain what to do. If any of these conditions apply to you, inform your doctor before Nexplanon is inserted. Also inform your doctor if any of these conditions develop or worsen during use of Nexplanon:
- if you have had breast cancer;
- if you have or have had liver disease;
- if you have ever had thrombosis;
- if you have diabetes;
- if you are overweight;
- if you have epilepsy;
- if you have tuberculosis;
- if you have high blood pressure;
- if you have or have had chloasma (brownish-yellow patches on the skin, especially on the face); in this case, avoid excessive exposure to sunlight or ultraviolet radiation.
Possible serious conditions
Cancer
The information below comes from studies in women taking a combined oral contraceptive containing two different female hormones daily (the "pill"). It is not known whether these observations also apply to women using a different hormonal contraceptive, such as progestin-only implants.
Breast cancer has been detected slightly more frequently in women using combined oral contraceptives, but it is not known whether this is caused by the treatment. For example, it may be that tumours are detected more frequently in women using the combined pill because they undergo medical check-ups more regularly. The increased incidence of breast cancer gradually decreases after stopping the combined pill. It is important to examine your breasts regularly and consult your doctor if you feel a lump. Inform your doctor if a close relative has or has had breast cancer.
Benign liver tumours have been reported rarely, and malignant liver tumours even more rarely, in women taking the pill. If you experience severe abdominal pain, consult your doctor immediately.
Thrombosis
The presence of a blood clot in a vein (known as "venous thrombosis") can block the vein. Thrombosis may occur in the veins of the legs, lungs (pulmonary embolism), or other organs. The presence of a blood clot in an artery (known as "arterial thrombosis") can block the artery. For example, a blood clot in an artery may cause a heart attack or, in the brain, a stroke.
Using any combined hormonal contraceptive increases a woman's risk of developing such clots compared to a woman who does not use any combined hormonal contraceptive. This risk is not as high as the risk of developing a blood clot during pregnancy. It is believed that the risk associated with progestin-only methods, such as Nexplanon, is lower than that with estrogen-containing pills. There have been reports of blood clot formation such as pulmonary embolism, deep vein thrombosis, heart attacks, and strokes in women using etonogestrel implants; however, available data do not suggest an increased risk of these events in women using the implant.
If you suddenly notice possible signs of thrombosis, you must consult your doctor immediately (see also “When to contact your doctor?”).
Other conditions
Changes in menstrual bleeding patterns
As with other progestin-only contraceptives, changes in menstrual bleeding patterns may occur during use of Nexplanon. Changes may include frequency (absent, less frequent, more frequent, or continuous), intensity (reduced or increased), or duration. Absence of bleeding has been reported by about 1 in 5 women, and another 1 in 5 women reported frequent and/or prolonged bleeding. Occasionally, heavy bleeding has been observed. In clinical studies, changes in bleeding were the most common reason for discontinuation of treatment (approximately 11%).
The bleeding pattern observed during the first three months generally indicates what future patterns will be.
A change in bleeding pattern does not mean that Nexplanon is unsuitable for you or that it is not providing contraceptive protection. Usually, no intervention is necessary. If menstrual bleeding is heavy or prolonged, you should consult your doctor.
Events related to insertion and removal
If inserted incorrectly or due to external forces (e.g., manipulation of the implant or contact sports), the implant may move from its original insertion site in the arm. In rare cases, implants have been found in blood vessels of the arm or in the pulmonary artery (a blood vessel inside the lung).
When the implant migrates from its original insertion site, locating it may become more difficult, and removal may require a larger incision or a surgical procedure in hospital. If you cannot locate the implant in your arm, the healthcare provider may use X-rays or other imaging techniques to examine the chest. If the implant is in the chest, surgical intervention may be necessary.
If the implant cannot be located and there are no signs of expulsion, the contraceptive effect and the risk of progestin-related side effects may persist longer than desired.
If at any time you cannot feel the implant, you must contact your doctor as soon as possible.
Psychiatric disorders
Some women using hormonal contraceptives, including Nexplanon, have reported depression or low mood. Depression can be severe and may sometimes lead to suicidal thoughts. If you experience mood changes or depressive symptoms, contact your doctor for further advice as soon as possible.
Ovarian cysts
During use of all low-dose hormonal contraceptives, small fluid-filled sacs may form in the ovaries. These are known as ovarian cysts, which usually disappear spontaneously. They may sometimes cause mild abdominal pain. Only rarely can they lead to more serious complications.
Broken or bent implant
If the implant breaks or bends while inserted in the arm, its function should not be affected. Breakage or bending may occur due to external forces. A broken implant may move from the insertion site. If you have any doubts, contact your healthcare provider.
Other medicines and Nexplanon
Always inform your doctor about any medicines or herbal products you are currently taking. Also inform any other doctors or dentists who prescribe medications (or your pharmacist) that you are using Nexplanon, so they can determine whether additional contraceptive methods (e.g., a condom) are needed, and if so, for how long, or whether it is necessary to adjust the dose of another medicine you are taking.
Some medicines
- may affect Nexplanon levels in the blood
- may reduce the effectiveness of etonogestrel in preventing pregnancy
- may cause unexpected bleeding.
These include medicines used to treat the following conditions:
- epilepsy (e.g., primidone, phenytoin, barbiturates, carbamazepine, oxcarbazepine, topiramate, felbamate),
- tuberculosis (e.g., rifampicin),
- HIV infections (e.g., nelfinavir, nevirapine, efavirenz),
- hepatitis C virus infection (e.g., boceprevir, telaprevir),
- other infectious diseases (e.g., griseofulvin),
- high blood pressure in the blood vessels of the lungs (bosentan),
- depression (St John’s wort (Hypericum perforatum)).
Nexplanon may affect the action of other medicines, for example:
- medicines containing cyclosporine
- the antiepileptic lamotrigine (this may lead to an increase in seizure frequency)
Ask your doctor or pharmacist for advice before taking any medicine.
Nexplanon with food and drink
There are no indications of any effect of food or drink on the use of Nexplanon.
Pregnancy and breastfeeding
You must not use Nexplanon if you are pregnant or think you may be pregnant. If in doubt, perform a pregnancy test before starting to use Nexplanon.
Nexplanon can be used during breastfeeding. Although small amounts of the active substance of Nexplanon pass into breast milk, there are no effects on milk production or quality, nor on the growth and development of the infant.
If you are breastfeeding, consult your doctor before using this medicine.
Children and adolescents
The safety and efficacy of Nexplanon in adolescents under 18 years of age have not been studied.
Driving and using machines
There are no signs of any effect of Nexplanon on alertness or concentration.
When to contact your doctor?
Regular medical checks
Before insertion of Nexplanon, the healthcare provider will ask you some questions about your personal medical history and that of your close relatives. The healthcare provider will also measure your blood pressure and, depending on your personal situation, may perform other tests. During use of Nexplanon, the healthcare provider may ask you to return for a (routine) medical check-up some time after implant insertion. The frequency and nature of further checks will depend on your personal situation. The healthcare provider must palpate the implant at every check-up visit.
Contact your doctor as soon as possible if:
- you notice any change in your health status, especially if it involves any of the aspects mentioned in this leaflet (see also “Do not use Nexplanon” and “Warnings and precautions”; do not forget aspects related to close family members);
- you notice possible signs of thrombosis such as severe pain or swelling in one leg, unexplained chest pain, shortness of breath, unusual cough, especially if accompanied by coughing up blood;
- you experience sudden, severe stomach pain or develop yellowing of the skin;
- you feel a lump in your breast (see also “Cancer”);
- you have sudden or severe lower abdominal or stomach pain;
- you have unusual, heavy vaginal bleeding;
- you need to be immobilized (e.g., confined to bed) or undergo surgery (consult your doctor at least four weeks beforehand);
- you suspect you are pregnant;
- the implant is not palpable after insertion or at any time.
3. How to use Nexplanon
If you are pregnant or think you may be pregnant, inform your healthcare provider before Nexplanon is inserted
(e.g., if you have had unprotected sexual intercourse during your current menstrual cycle).
How to use
Nexplanon must be inserted and removed only by a healthcare provider experienced with the procedures described on the other side of this leaflet. Your healthcare provider will decide with you the most appropriate time for insertion, based on your individual circumstances (e.g., the contraceptive method you are currently using). Unless you are switching directly from another hormonal contraceptive method, insertion should take place on day 1–5 of spontaneous menstrual bleeding to exclude pregnancy. If the implant is inserted after the fifth day of the menstrual cycle, you must use an additional contraceptive method (such as a condom) for the first 7 days after insertion.
Before inserting or removing Nexplanon, your healthcare provider will administer a local anesthetic.
Nexplanon is inserted directly under the skin in the inner upper part of the non-dominant arm (the arm you do not write with). A description of the insertion and removal procedures for Nexplanon is provided in section 6.
The implant should be palpable after insertion
At the end of the insertion procedure, your healthcare provider will ask you to palpate the implant (feel for its presence under the skin). A correctly inserted implant should be clearly palpable both by the healthcare provider and by you, and you should be able to feel both ends of the implant between your thumb and index finger. Please note that palpation does not guarantee 100% confirmation of the implant’s presence. If the implant cannot be felt immediately after insertion, or at any time, it may not have been inserted, may have been inserted too deeply, or may have migrated from the original insertion site.
Therefore, it is important to gently palpate the implant from time to time to ensure you know its location. If you are unable to feel the implant at any time, contact your doctor as soon as possible.
If there is any doubt, however small, you must use a barrier method (e.g., a condom) until both you and your healthcare provider are absolutely certain that the implant has been inserted. Your healthcare provider may need to use X-rays, ultrasound, or magnetic resonance imaging (MRI), or take a blood sample, to confirm that the implant has been placed in the arm. If, after thorough investigation, the implant cannot be located within the arm, your healthcare provider may use X-rays or other imaging techniques to examine the chest area.
Once your healthcare provider has successfully located an implant that was not palpable, the implant must be removed.
Nexplanon must be removed or replaced no later than three years after insertion.
Patient Alert Card
To help you remember when and where Nexplanon was inserted and by which date it must be removed at the latest, your healthcare provider will give you a Patient Alert Card containing this information. The Patient Alert Card also includes instructions to gently palpate the implant from time to time to ensure you know its location. If you are unable to feel the implant at any time, contact your doctor as soon as possible. Keep the card in a safe place! Show the Patient Alert Card to your healthcare provider at every visit related to the use of the implant.
If you wish to replace Nexplanon, a new implant may be inserted immediately after removal of the old one. The new implant may be inserted in the same arm and at the same site as the previous implant, provided the site is correctly positioned. Your healthcare provider will advise you.
If you wish to stop using Nexplanon
You may ask your healthcare provider to remove the implant at any time.
If the implant cannot be located by palpation, your healthcare provider may use X-rays, ultrasound, or MRI to locate it. Depending on the exact position of the implant, removal may be difficult and could require a surgical procedure.
If you do not wish to become pregnant after Nexplanon is removed, ask your healthcare provider about other reliable methods of contraception.
If you discontinue Nexplanon because you wish to become pregnant, it is generally recommended to wait until your next natural menstrual period before attempting conception. This helps predict the baby’s due date.
4. Possible side effects
Like all medicines, Nexplanon can cause side effects, although not everyone experiences them.
During use of Nexplanon, menstrual bleeding at irregular intervals may occur. This may be only mild spotting that does not even require the use of a sanitary pad, or it may be heavier bleeding resembling a light menstruation, requiring the use of sanitary pads. It is also possible to have no bleeding at all. Irregular bleeding is not a sign of reduced contraceptive protection with Nexplanon. Normally, no intervention is required. However, if bleeding is heavy or prolonged, consult your doctor.
Serious side effects are described in section 2 under "Cancer" and "Thrombosis". For further information, read these sections and, when necessary, consult your doctor immediately.
The following side effects have been reported:
| Very common (may affect more than 1 in 10 people) | Common (may affect up to 1 in 10 people) | Uncommon (may affect up to 1 in 100 people) |
| Acne, headache, weight gain, breast tenderness and pain, irregular bleeding, vaginal infection. | Hair loss, dizziness, depressed mood, emotional lability, nervousness, decreased libido, increased appetite, abdominal pain, nausea, stomach and intestinal gas, painful menstruation, weight loss, flu-like symptoms, pain, fatigue, hot flush, pain at implant site, reaction at implant site, ovarian cysts. | Itching, genital itching, rash, excessive hair growth, migraine, anxiety, insomnia, somnolence, diarrhoea, vomiting, constipation, urinary tract infection, vaginal discomfort (e.g. vaginal discharge), breast enlargement, breast discharge, back pain, fever, fluid retention, painful or difficult urination, allergic reactions, inflammation and pain in the throat, rhinitis, joint pain, muscle pain, bone pain. |
In addition to the above-mentioned adverse effects, an increase in blood pressure has been occasionally observed. Increased pressure in the head (benign intracranial hypertension) has been reported, with signs such as persistent headache, together with feeling unwell (nausea), malaise (vomiting), and changes in vision including blurred vision. Oily skin has also been observed. You must consult your doctor immediately if you experience symptoms of a severe allergic reaction, such as (i) swelling of the face, tongue or throat; (ii) difficulty swallowing; or (iii) hives and breathing difficulties. Bruising (in some cases severe), pain, swelling or itching may occur during insertion or removal of Nexplanon, and in rare cases, infection. A scar may form or an abscess may develop at the insertion site. Due to the insertion of the implant, you may feel faint. Numbness or a sensation of numbness (or lack of sensation) may occur. Expulsion or migration of the implant may occur, especially if the implant has not been correctly inserted. Rarely, cases have been reported of implants found within a blood vessel, including a pulmonary blood vessel, which may be associated with shortness of breath and/or coughing with or without bleeding. Surgical intervention may be required to remove the implant. There have been reports of blood clots forming in a vein (known as "venous thrombosis") or in an artery (known as "arterial thrombosis") in women using the etonogestrel implant. A blood clot in a vein may block the vein and may occur in the veins of the legs (deep vein thrombosis), lungs (pulmonary embolism), or other organs. A blood clot in an artery may block the artery and may cause a heart attack or, in the brain, may cause a stroke.
If you experience any adverse effect, including those not listed in this leaflet, talk to your doctor, pharmacist or nurse.
Reporting of adverse effects
If you experience any adverse effect, including those not listed in this leaflet, talk to your doctor, pharmacist or nurse. You can also report adverse effects directly via reazioni-avverse. By reporting adverse effects, you can help provide more information on the safety of this medicine.
5. How to store Nexplanon
Keep this medicinal product out of the sight and reach of children.
Do not use this medicinal product after the expiry date stated on the blister and the carton.
Store in the original blister.
Do not dispose of any medicinal product via wastewater or household waste. Ask your pharmacist how to dispose of medicines you no longer use. This will help protect the environment.
This medicinal product requires no special storage conditions.
6. Package contents and other information
What Nexplanon contains
Each applicator contains one implant with:
- The active substance is: etonogestrel (68 mg)
- The other components are: ethylene vinylacetate copolymer, barium sulphate and magnesium stearate.
Description of the appearance of Nexplanon and contents of the pack
Nexplanon is a long-acting hormonal contraceptive for subcutaneous use. It consists of a
radiopaque, single progestin implant, preloaded in an innovative, ready-to-use, single-use, easy-to-use
applicator. The implant is white in colour, 4 cm long and 2 mm in diameter, and contains etonogestrel and barium sulphate. The applicator is designed to facilitate insertion of the implant just under the skin of the inner upper arm (non-dominant). The implant must be inserted and removed by a healthcare provider familiar with these procedures. To avoid complications during removal, the implant must be inserted just under the skin (see the other side of this leaflet). A local anaesthetic must be used before inserting or removing the implant. If the instructions provided are followed, the risk of complications is low.
Pack sizes: cardboard box containing 1 blister, cardboard box containing 5 blisters.
Not all pack sizes may be marketed.
Marketing Authorisation Holder and Manufacturer
Marketing Authorisation Holder
Organon Italia S.r.l.
Piazza Carlo Magno, 21
00162 Rome
Italy
Tel.: +39 06 90259059
Manufacturer
N.V. Organon, Kloosterstraat 6, 5349 AB Oss (The Netherlands)
This medicinal product is authorised in the European Economic Area and in the United Kingdom (Northern Ireland) under the following names:
Austria, Belgium, Germany, Ireland, Luxembourg, Malta, the Netherlands, Slovakia, Poland, Portugal, Spain: Implanon
Denmark, Estonia, Finland, France, Iceland, Italy, Norway, Romania, Sweden, United Kingdom (Northern Ireland): Nexplanon
The following pictograms are intended only to illustrate the insertion and removal procedures
to the woman receiving the implant.
Note: The exact procedures for insertion and removal of Nexplanon, which must be performed
by a qualified healthcare provider, are described in the Summary of Product Characteristics and in section 7 on the other side of this patient leaflet.
6.1 How Nexplanon is inserted
- Insertion of Nexplanon must be performed by a qualified healthcare provider familiar with the procedure.
- To facilitate implant insertion, you will lie on your back with your elbow bent and your hand placed under your head (or as close as possible).
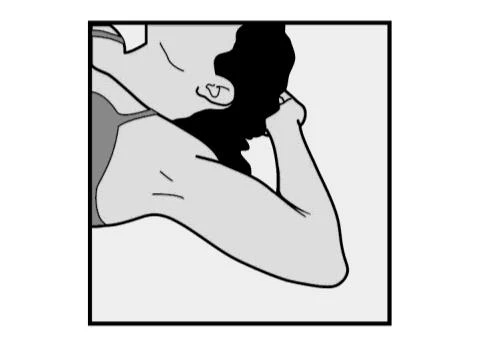
- The implant will be inserted into the inner upper part of the non-dominant arm (the arm you do not use for writing).
- The insertion site will be marked on the skin and the area disinfected and anaesthetised.
- The skin is stretched and the needle is inserted directly under the skin. Once the tip of the needle has entered the skin, it is fully inserted with a movement parallel to the skin.
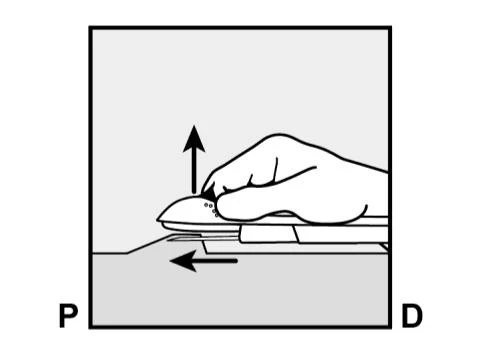
P, proximal (towards the shoulder);
D, distal (towards the elbow)
- The purple-coloured slider is unlocked to retract the needle. The implant will remain in the upper arm when the needle is withdrawn.
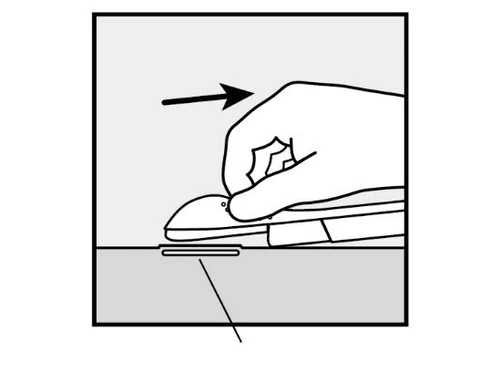
P D
- The presence of the implant must be verified by palpation (feeling for it) immediately after insertion. A correctly inserted implant can be felt between thumb and index finger by both the healthcare provider and yourself. Please be aware that palpation does not allow confirmation of the presence of the implant with 100% certainty.
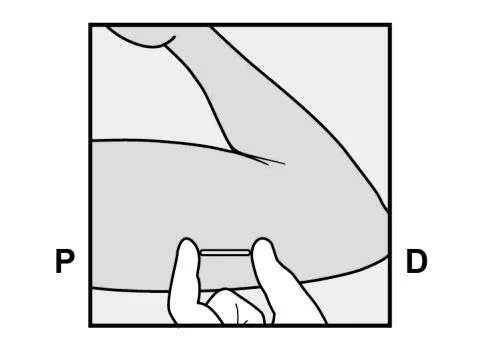
- If the implant cannot be palpated or its presence is uncertain, other methods must be used to confirm the presence of the implant.
- Once the healthcare provider has located an implant that was not palpable, the implant must be removed.
- Until the presence of the implant has been confirmed, you may not be protected against pregnancy and a barrier contraceptive method (e.g. a condom) must be used.
- A small adhesive dressing will be placed over the insertion site, together with a pressure dressing to reduce the risk of bruising. You may remove the pressure dressing after 24 hours and the small adhesive dressing over the insertion site after 3–5 days.
- After implant insertion, the healthcare provider will give you a Patient Alert Card indicating the insertion site, the date of insertion, and the latest date by which the implant must be removed or replaced. Keep this card in a safe place, as the information recorded may assist in future removal.
6.2 How Nexplanon should be removed
- The implant must be removed only by a qualified healthcare provider familiar with the procedure.
- The implant is removed either at your request or no later than 3 years after insertion.
- The location of the insertion site is indicated on the Patient Alert Card.
- The healthcare provider will locate the implant. If the implant cannot be located, the healthcare provider may need to use X-rays, computed tomography (CT), ultrasound, or magnetic resonance imaging.
- To facilitate removal of the implant, you will
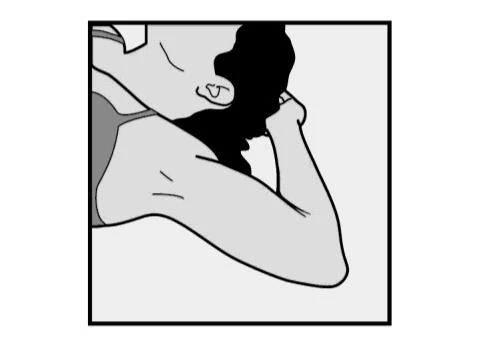
lie on your back with your elbow bent
and your hand under your head (or as close as possible).
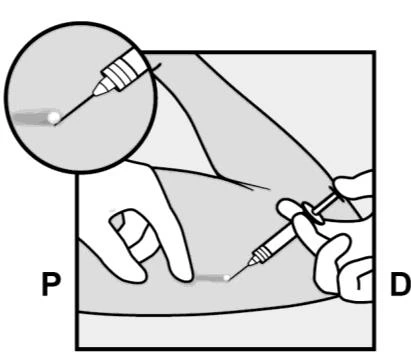
- The upper part of your arm will be disinfected and anaesthetised.
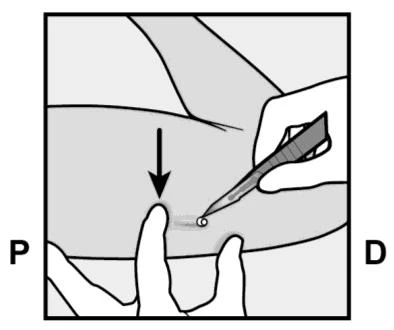
- A small incision will be made along the arm, just below the end of the implant.
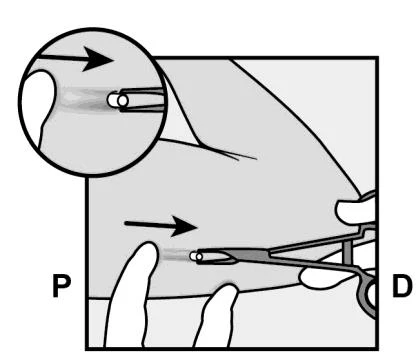
- The implant is gently pushed through the incision and removed with forceps.
- Occasionally, the implant may be surrounded by hard tissue. In this case, a small cut in this tissue must be made before removing the implant.
- If you wish the healthcare provider to replace Nexplanon with another implant, the new implant may be inserted using the same incision, provided the site is correctly positioned.
- The incision will be closed with a sterile wound closure strip.
- A pressure dressing will be applied to minimise bruising. You may remove the pressure dressing after 24 hours and the sterile wound closure strip over the insertion site after 3–5 days.
The following information is intended for healthcare professionals only:
7. Information for the healthcare provider
7.1 When to insert Nexplanon
IMPORTANT: Exclude pregnancy before implant insertion.
The timing of insertion depends on the woman’s recent contraceptive history, as follows:
No prior hormonal contraceptive use in the last month
The implant must be inserted between Day 1 (the first day of menstrual bleeding) and Day 5 of the menstrual cycle, even if the woman is still bleeding.
If inserted as recommended, no additional contraceptive method is needed. If insertion deviates from the recommended timing, the woman should be advised to use a barrier method for up to 7 days after insertion. If sexual intercourse has already occurred, pregnancy must be excluded.
Switching from a hormonal contraceptive method to Nexplanon
Switching from a combined hormonal contraceptive (combined oral contraceptive (COC), vaginal ring, or transdermal patch)
The implant should preferably be inserted on the day after taking the last active tablet (the last tablet containing active ingredients) of the previous combined oral contraceptive, or on the day of removal of the vaginal ring or transdermal patch. At the latest, the implant must be inserted on the day following the usual tablet-free, ring-free, patch-free, or placebo interval of the previous combined hormonal contraceptive, when the next application would have occurred. Not all contraceptive methods (transdermal patch, vaginal ring) may be available in all countries.
If inserted as recommended, no additional contraceptive method is needed. If insertion deviates from the recommended timing, the woman should be advised to use a barrier method for up to 7 days after insertion. If sexual intercourse has already occurred, pregnancy must be excluded.
Switching from a progestin-only method (e.g., pill, injectable, implant, or progestin-only intrauterine system [IUS])
As there are many types of progestin-only methods, implant insertion should be performed as follows:
- Injectable contraceptives: Insert the implant on the day the next injection is due.
- Progestin-only pill: A woman may switch from the progestin-only pill to Nexplanon on any day of the month. The implant must be inserted within 24 hours after taking the last tablet.
- Implant/intrauterine system (IUS): Insert the implant on the same day as removal of the previous implant or IUS.
If inserted as recommended, no additional contraceptive method is needed. If insertion deviates from the recommended timing, the woman should be advised to use a barrier method for up to 7 days after insertion. If sexual intercourse has already occurred, pregnancy must be excluded.
After an abortion or miscarriage
The implant may be inserted immediately after an abortion or miscarriage:
- First trimester: If inserted within 5 days, no additional contraceptive method is needed.
- Second trimester: If inserted within 21 days, no additional contraceptive method is needed.
If insertion occurs after the recommended timing, the woman should be advised to use a barrier method for up to 7 days after insertion. If sexual intercourse has already occurred, pregnancy must be excluded before insertion.
After childbirth
The implant may be inserted immediately after childbirth, even in women who are breastfeeding, based on an individual assessment of benefit-risk.
- If inserted within 21 days after childbirth, no additional contraceptive method is needed.
- If inserted more than 21 days after childbirth, the woman should be advised to use a barrier method for up to 7 days after insertion. If sexual intercourse has already occurred, pregnancy must be excluded before insertion.
7.2 How to insert Nexplanon
Correct and careful subcutaneous insertion of the implant into the non-dominant upper arm, performed according to instructions, is fundamental for effective use and subsequent removal of Nexplanon. Both the healthcare provider and the woman should be able to feel the implant under the skin after placement.
The implant must be inserted subcutaneously, just beneath the skin, in the inner aspect of the upper non-dominant arm.
- An implant inserted deeper than subcutaneous level (deep insertion) may not be palpable, and localization and/or removal may become difficult (see section 4.2 How to remove Nexplanon and section 4.4 of the Summary of Product Characteristics).
- Deep or incorrect insertion may cause neural or vascular injury. Deep or incorrect insertions have been associated with paresthesia (due to neural injury), implant migration (due to intramuscular or fascial insertion), and, rarely, intravascular insertion.
Nexplanon insertion must be performed under aseptic conditions and exclusively by a qualified healthcare provider familiar with the procedure. The implant must be inserted only with the preloaded applicator.
Insertion procedure
To ensure the implant is inserted just beneath the skin, the healthcare provider should position themselves to observe the needle advancement laterally, viewing the applicator from the side rather than from above the arm. A lateral view clearly shows the insertion site and needle movement just beneath the skin.
For illustrative purposes, the Figures show the inner aspect of the left arm.
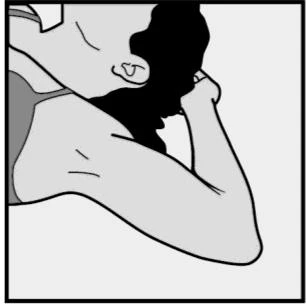
- Have the woman lie supine on the examination table, with the non-dominant arm bent at the elbow and externally rotated so that the hand is placed under the head (or as close as possible) (Figure 1).
Figure 1
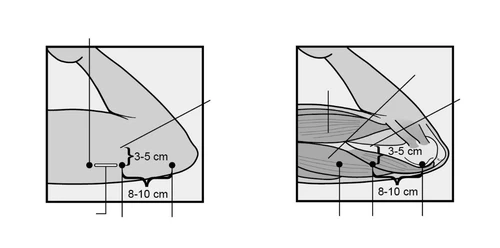
Identify the insertion site on the inner aspect of the upper non-dominant arm. The insertion site lies over the triceps muscle, approximately 8–10 cm (3–4 inches) above the medial epicondyle of the humerus and 3–5 cm (1.25–2 inches) posterior (below) the groove (sulcus) between the biceps and triceps muscles (Figures 2a, 2b, and 2c). This location aims to avoid major blood vessels and nerves running within and around the groove. If insertion at this site is not possible (e.g., in women with thin arms), the implant should be placed as posterior as possible relative to the groove.
- Mark two points with a surgical marker: the first point indicates where the implant will be inserted; the second point should be proximal (toward the shoulder) to the first by 5 cm (2 inches) (Figures 2a and 2b). The second point (guide point) will later help guide direction during insertion.
P D P D
Figure 2a Figure 2b
P - proximal (toward the shoulder);
D - distal (toward the elbow)
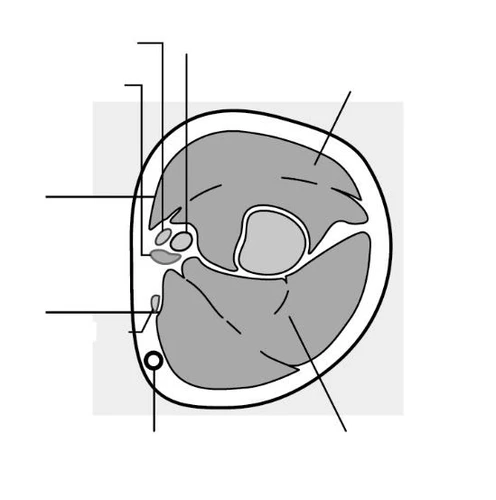
Figure 2c
Cross-section of the upper left arm, viewed from the elbow
Medial (inner aspect of the arm)
Lateral (outer aspect of the arm)
- After marking the arm, confirm the site is correctly positioned on the inner aspect of the arm.
- Cleanse the skin from the insertion site to the guide point with an antiseptic.
- Anesthetize the insertion area (e.g., with an anesthetic spray or by injecting 2 mL of 1% lidocaine just beneath the skin along the intended insertion path).
- Remove the sterile, single-use, preloaded Nexplanon applicator containing the implant from its blister pack. Check the packaging integrity visually for any damage (e.g., torn, punctured, etc.). If visible damage is present that could compromise sterility, do not use the applicator.
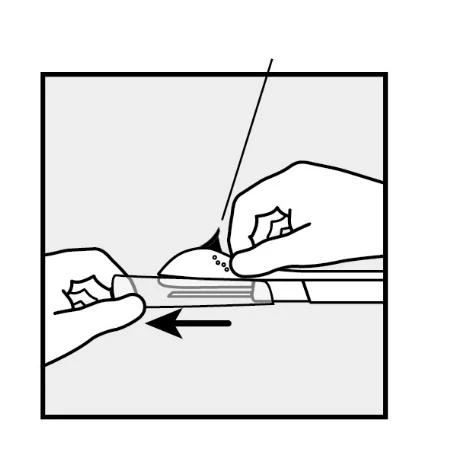
Hold the applicator just above the needle at the level of the rough surface. Remove the transparent protective cap from the needle by sliding it horizontally in the direction of the arrow (Figure 3). If the cap does not remove easily, do not use the applicator. The white-colored implant should be visible through the needle tip. Do not touch the purple slider until the needle is fully inserted subcutaneously, as doing so may cause premature needle retraction and premature implant release from the applicator.
- If the purple slider is released prematurely, restart the procedure with a new applicator.
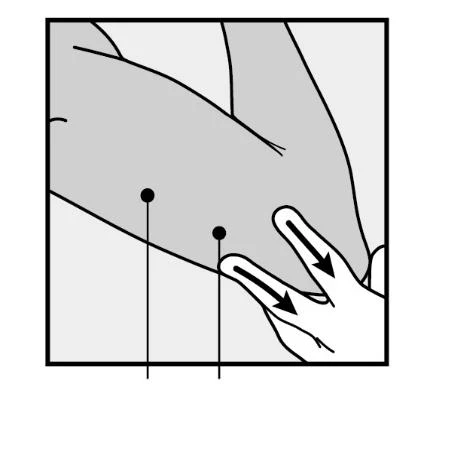
- With the free hand, stretch the skin around the insertion site toward the elbow (Figure 4).
P D
Figure 4
- The implant must be inserted subcutaneously, just beneath the skin (see section 4.4 in the SmPC). To ensure the implant is inserted just beneath the skin, position yourself to view the needle advancement laterally, not from above the arm. A lateral view clearly shows the insertion site and needle movement just beneath the skin (see Figure 6).
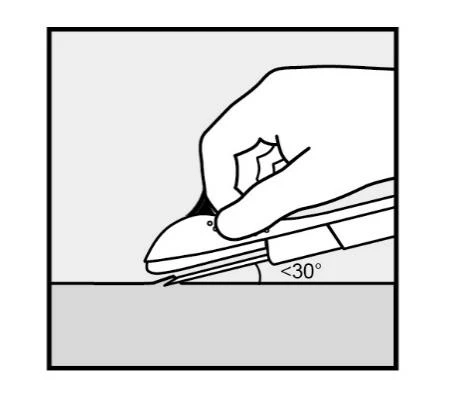
Insert the needle tip into the skin at a slight angle, less than 30° (Figure 5a).
P D
Figure 5a
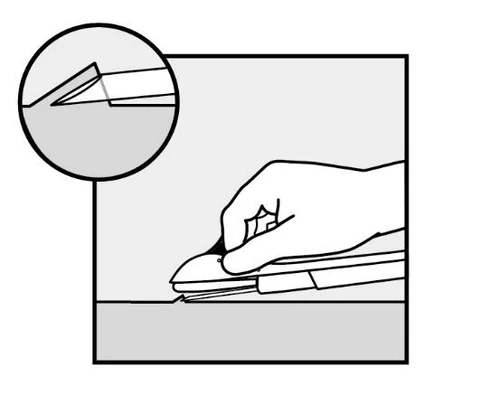
Insert the needle until the bevel (oblique opening of the tip) is just beneath the skin (and not beyond) (Figure 5b). If the needle has been inserted deeper than the bevel, withdraw the needle until only the bevel is beneath the skin.
P D
Figure 5b
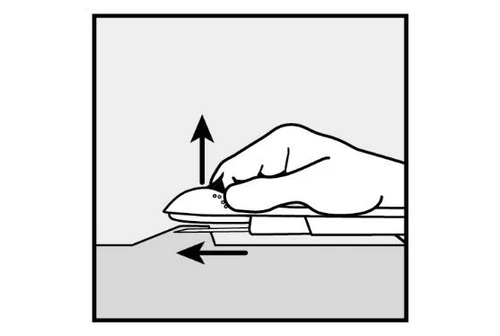
- Lower the applicator to an almost horizontal position. To facilitate subcutaneous placement, keep the skin elevated with the needle and slide the needle along its full length (Figure 6). A slight resistance may be felt, but do not apply excessive force. If the needle is not fully inserted, the implant will not be correctly placed. If, before completing needle insertion, the needle tip emerges from the skin, the needle must be withdrawn and repositioned subcutaneously to complete the insertion procedure.
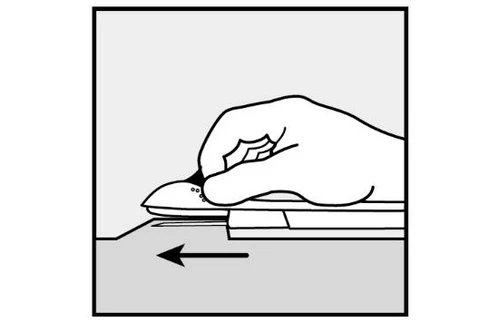
- Hold the applicator in the same position with the needle fully inserted (Figure 7). If necessary, use the free hand to stabilize the applicator.
P D
Figure 7
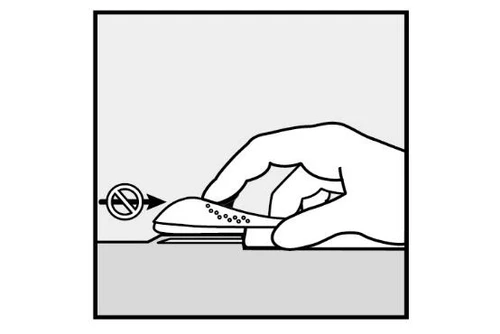
- Unlock the purple slider by pressing it slightly downward (Figure 8a). Move the slider fully backward until it locks.

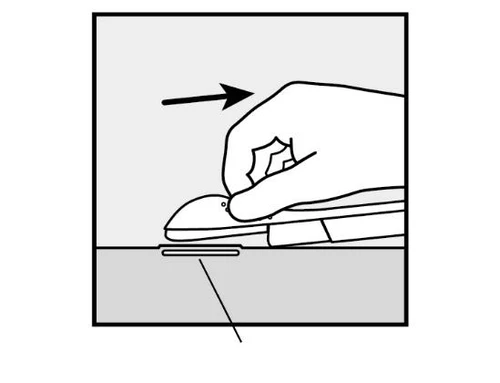
Do not move ( ) the applicator while moving the purple slider (Figure 8b). The implant is now in its final subcutaneous position, and the needle is retracted and locked inside the applicator body. The applicator can now be removed (Figure 8c).
P D
Figure 8a
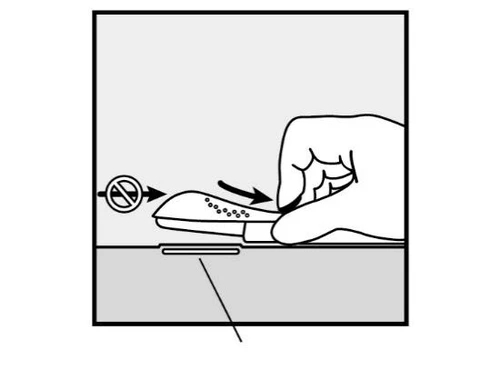
P D P D
Figure 8b Figure 8c
If the applicator is not held in the same position during this step, or if the purple slider is not pulled fully backward until it locks, the implant will not be correctly inserted and may extrude from the insertion site.
If the implant extrudes from the insertion site, remove the implant and repeat the procedure at the same insertion site using a new applicator. Do not push a protruding implant back into the incision.
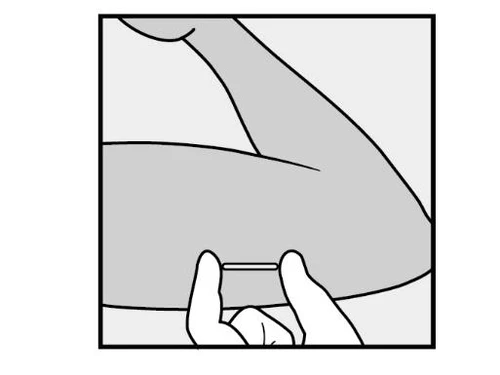
Apply a small adhesive bandage over the insertion site.
- Always confirm the presence of the implant in the woman’s arm immediately after insertion by palpation. By palpating both ends of the implant, you should be able to confirm the presence of a 4 cm rod (Figure 9). See the following section “If the implant is not palpable after insertion”.
P D
Figure 9 - Ask the woman to palpate the implant.
- Apply a sterile gauze with a pressure bandage to minimize bruising. The woman may remove the pressure bandage after 24 hours and the small adhesive bandage over the insertion site after 3–5 days.
- Complete the Patient Alert Card and give it to the patient to keep. Complete the adhesive label and affix it to the patient’s medical record. If using an electronic medical record, record the information from the adhesive label.
- The applicator is for single use only and must be properly disposed of in accordance with local regulations for handling biohazardous waste.
If the implant is not palpable after insertion:
If the implant is not palpable or there is doubt about its presence, the implant may not have been inserted or may have been inserted too deeply:
-
Check the applicator. The needle should be fully retracted, and only the tip of the purple plunger should be visible.
-
Use other methods to confirm the presence of the implant. As the implant is radiopaque, available imaging methods for localization include two-dimensional X-ray and computed tomography (CT). High-frequency linear ultrasound (10 MHz or higher) or magnetic resonance imaging (MRI) may also be used. If the implant cannot be localized with these imaging methods, measuring the etonogestrel level in a blood sample from the patient may confirm its presence. In such cases, contact the local representative of the Marketing Authorization Holder for the appropriate protocol.
-
Until the presence of the implant is confirmed, the patient must use a non-hormonal contraceptive method.
-
Implants inserted too deeply must be localized and removed as soon as possible to prevent potential distant migration (see section 4.4 in the SmPC).
7.3 How to remove Nexplanon
Implant removal must be performed only under aseptic conditions by a healthcare provider familiar with the removal technique. If you are not familiar with the removal technique, contact the local representative of the Marketing Authorization Holder, Organon Italia S.r.l., Piazza Carlo Magno 21, 00162 Rome, Italy, Tel.: +39 06 90259059, for further information.
Before starting the removal procedure, the healthcare provider must assess the implant’s position. Confirm the exact location of the implant in the arm by palpation.
If the implant is not palpable, consult the Patient Alert Card or medical record to verify which arm contains the implant. If the implant cannot be palpated, it may have been inserted too deeply or may have migrated. Note that the implant may be near blood vessels and nerves. Removal of non-palpable implants must be performed only by a healthcare provider experienced in removing deeply placed implants and familiar with implant localization and arm anatomy. Contact the local representative of the Marketing Authorization Holder, Organon Italia S.r.l., Piazza Carlo Magno 21, 00162 Rome, Italy, Tel.: +39 06 90259059, for further information.
See the following section on “Localization and removal of a non-palpable implant” if the implant is not palpable.
Removal procedure for a palpable implant
For illustrative purposes, the Figures show the inner aspect of the left arm.
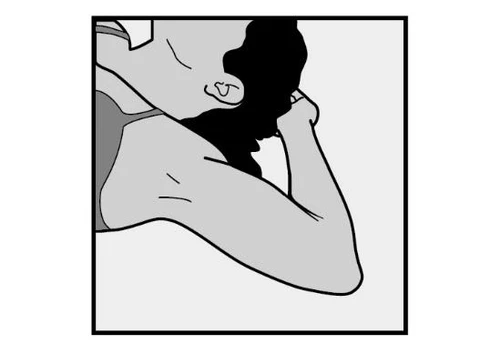
- Have the woman lie supine on the examination table. The arm should be positioned with the elbow bent and the hand under the head (or as close as possible). (See Figure 10).
- Locate the implant by palpation. Press down on the end of the implant closest to the shoulder (Figure 11) to stabilize it; a bulge should appear indicating the end of the implant closest to the elbow. If the end does not rise, implant removal may be difficult and should be performed by experienced providers in removing deeper implants. Contact the local representative of the Marketing Authorization Holder, Organon Italia S.r.l., Piazza Carlo Magno 21, 00162 Rome, Italy, Tel.: +39 06 90259059, for further information.
P D
Figure 10
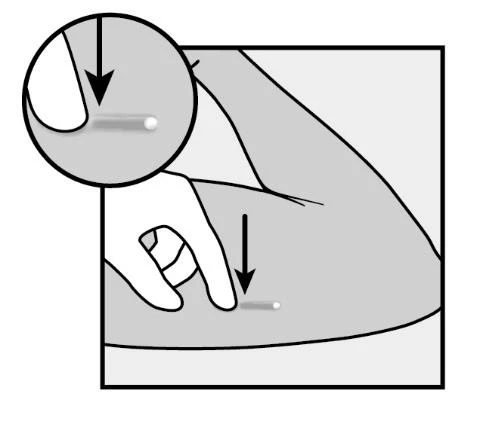
-
Mark the distal end (the end closer to the elbow), e.g., with a surgical marker.
P, proximal (toward the shoulder);
D, distal (toward the elbow)
P D
Figure 11 -
Cleanse the site where the incision will be made with an antiseptic.
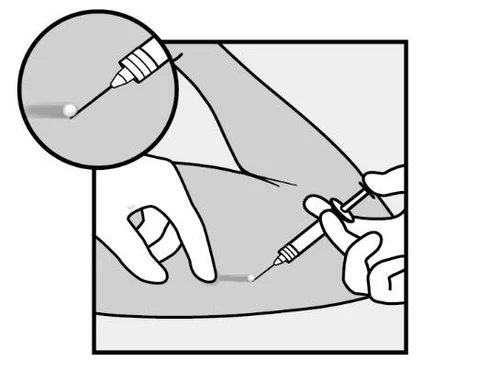
- Anesthetize the incision site, e.g., with 0.5–1 mL of 1% lidocaine (Figure 12). To ensure local anesthetic is injected under the implant, keep the implant close to the skin surface. Injecting local anesthetic above the implant may make removal more difficult.
P D
Figure 12
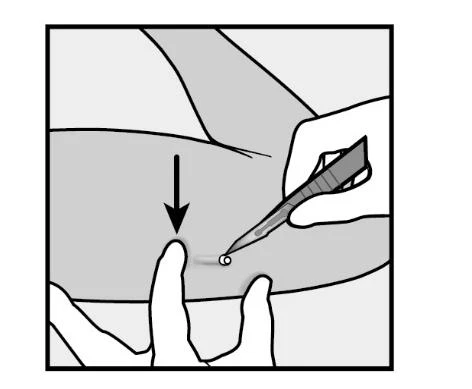
- Press down on the end of the implant closest to the shoulder to stabilize it throughout the procedure (Figure 13). Starting above the end of the implant closest to the elbow, make a 2 mm longitudinal incision (parallel to the implant) toward the elbow. Take care not to cut the end of the implant.
P D
Figure 13
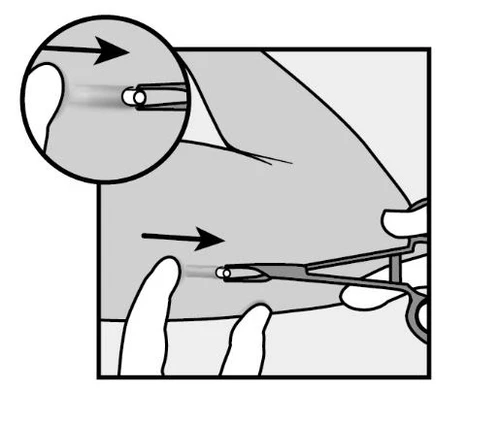
- The end of the implant should emerge from the incision. If it does not, gently push the implant toward the incision until the end becomes visible. Grasp the implant with forceps, if possible, and remove it (Figure 14).
If necessary, gently remove adherent tissue from the end of the implant using blunt dissection. If, after blunt dissection, the end of the implant is not exposed, make an incision into the fibrotic tissue and then remove the implant with forceps (Figures 15 and 16).
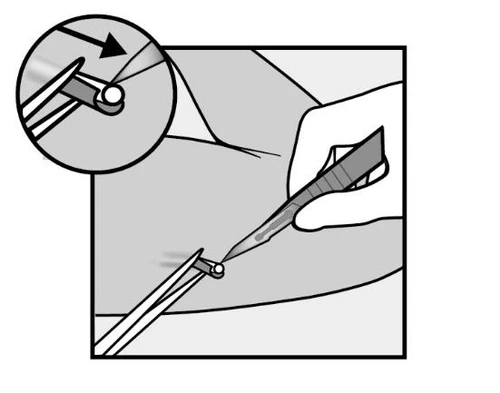
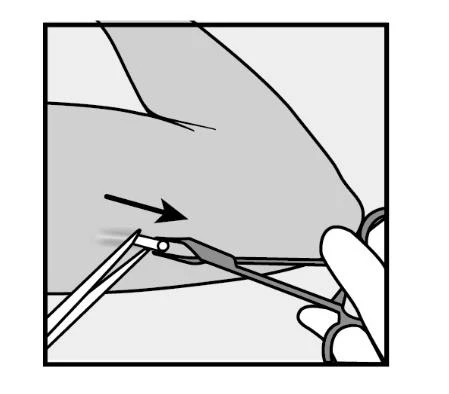
P D
P D
Figure 15 Figure 16
- If the end of the implant is not visible from the incision, gently insert forceps (preferably a curved “mosquito” forceps with tips facing upward) superficially into the incision (Figure 17).
- Gently grasp the implant and then pass the forceps to the other hand (Figure 18).
- With a second pair of forceps, carefully dissect the surrounding tissue and grasp the implant (Figure 19). The implant can then be removed.
- If the implant cannot be grasped, discontinue the procedure and refer the patient to a healthcare provider experienced in complex removals or contact the local representative of the Marketing Authorization Holder, Organon Italia S.r.l., Piazza Carlo Magno 21, 00162 Rome, Italy, Tel.: +39 06 90259059.
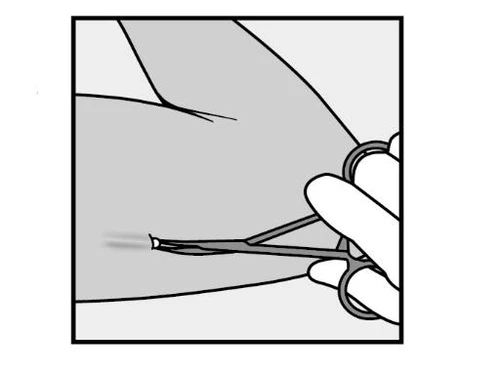
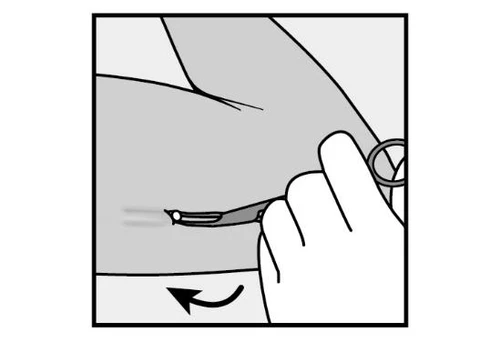
P D P D
Figure 17 Figure 18
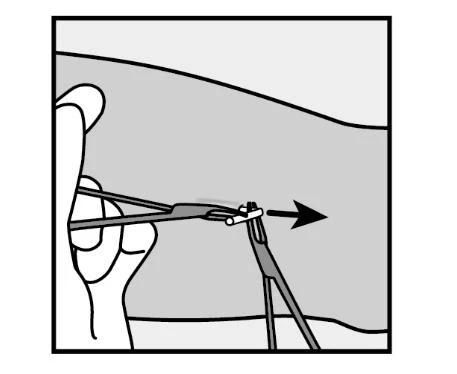
P D
Figure 19
- Confirm that the entire 4 cm rod has been removed by measuring its length. There have been reports of broken implants while inserted in the patient’s arm. In some cases, removal of a broken implant has been difficult. If a partial implant (less than 4 cm) is removed, the remaining portion must be removed following the instructions in this section.
- If the woman wishes to continue using Nexplanon, a new implant may be inserted immediately after removal of the old one, using the same incision, provided the site is correctly positioned (see section 7.4).
- After implant removal, close the incision with a sterile wound closure adhesive.
- Apply a sterile gauze with a pressure bandage to minimize bruising. The woman may remove the pressure bandage after 24 hours and the sterile wound closure adhesive after 3–5 days.
Localization and removal of a non-palpable implant
Occasional cases of implant migration have been reported; usually, movements are minimal from the original position (see also section 4.4 of the SmPC), but as a result, the implant may not be palpable at the original site. A deeply inserted or migrated implant may not be palpable, necessitating imaging techniques for localization, as described below.
A non-palpable implant must always be localized before attempting removal. As the implant is radiopaque, available localization methods include two-dimensional X-ray and computed tomography (CT). High-frequency linear ultrasound (10 MHz or higher) or magnetic resonance imaging (MRI) may also be used. After localization in the arm, the implant must be removed by a healthcare provider experienced in removing deeply placed implants and familiar with arm anatomy. Ultrasound guidance during removal should be considered.
If the implant cannot be localized in the arm after all necessary attempts, consider imaging of the chest, as extremely rare cases of migration into the pulmonary vascular system have been reported. If the implant is located in the chest, surgical or endovascular procedures may be required for removal; consultation with healthcare providers familiar with thoracic anatomy is advisable.
If, at any time, these imaging methods fail to locate the implant, measurement of serum etonogestrel levels may help confirm the presence of the implant. Contact the local representative of the Marketing Authorization Holder for further instructions.
If the implant migrates within the arm, removal may require a minor surgical procedure with a larger incision or an operating room procedure. Removal of deeply inserted implants must be performed cautiously to help prevent injury to deeper neural or vascular structures of the arm.
Non-palpable and deeply inserted implants must be removed by healthcare providers familiar with arm anatomy and removal of deeply inserted implants.
Exploratory surgery without knowing the exact location of the implant is strongly discouraged.
Contact the local representative of the Marketing Authorization Holder for further instructions.
7.4 How to replace Nexplanon
Immediate replacement may be performed after removal of the previous implant and is similar to the insertion procedure described in section 7.2.
The new implant may be inserted in the same arm and through the same incision used for removal of the previous implant, provided the site is correctly positioned—i.e., 8–10 cm from the medial epicondyle of the humerus and 3–5 cm posterior (below) the groove (see section 4.2 How to insert Nexplanon in the SmPC). If the same incision is used to insert a new implant, anesthetize the insertion site by injecting an anesthetic (e.g., 2 mL of 1% lidocaine) just beneath the skin, starting from the removal incision along the “insertion channel,” and follow the subsequent steps of the insertion instructions.