Hemlibra 30 mg/ml solution for injection
Spain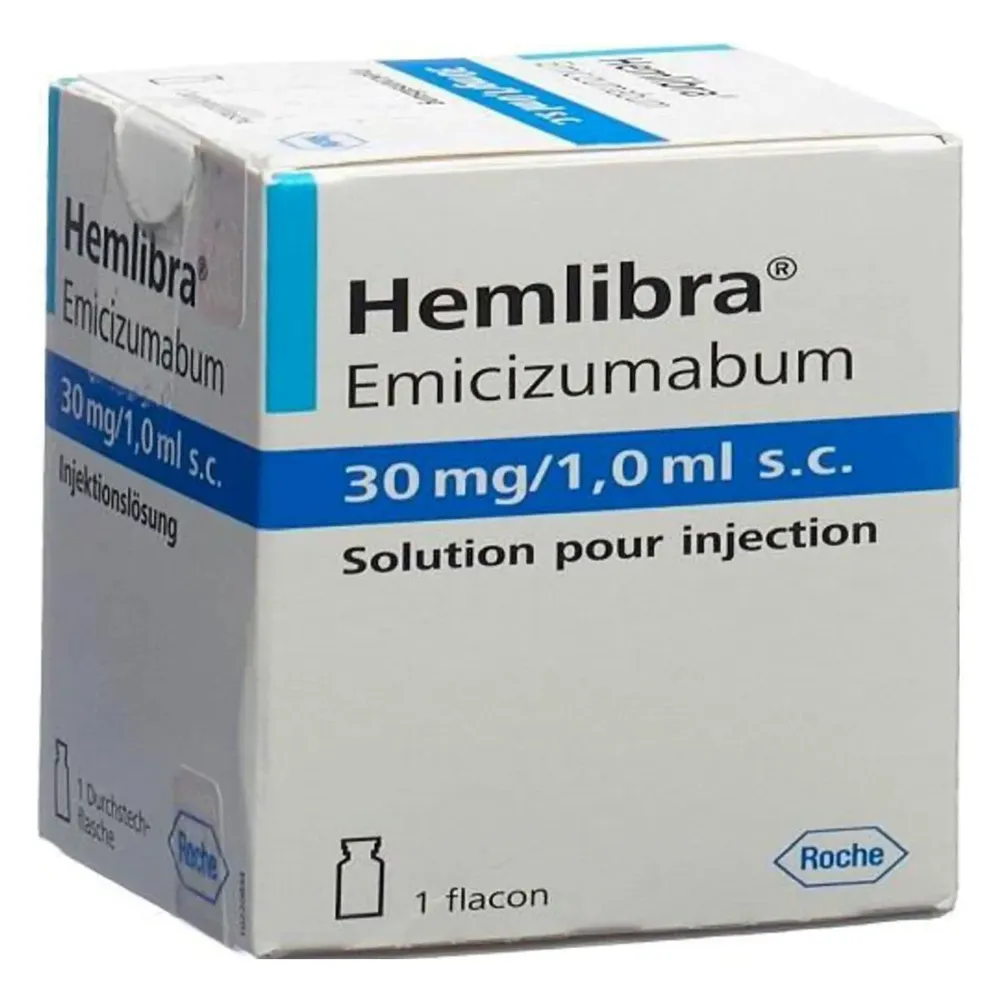
Table of Contents
Package leaflet: Information for the user
Introduction
Package leaflet: information for the user
Hemlibra 30mg/ml solution for injection
emicizumab
Read all of this leaflet carefully before you start using this medicine, because it contains important information for you.
- Keep this leaflet, as you may need to read it again.
- If you have any questions, ask your doctor, pharmacist or nurse.
- This medicine has been prescribed for you only, and you should not give it to other people, even if they have the same symptoms as you, because it may harm them.
- If you experience any adverse reactions, consult your doctor, pharmacist or nurse, even if they are adverse reactions not listed in this leaflet. See section 4.
In addition to this leaflet, your doctor will provide you with a patient information card and a guide (for patients/caregivers) containing important safety information you need to know. Always carry the card with you and show it to any healthcare professional, pharmacist or laboratory professional you may consult.
Contents of this leaflet
- What Hemlibra is and what it is used for
- What you need to know before using Hemlibra
- How to use Hemlibra
- Possible side effects
- How to store Hemlibra
- Contents of the pack and other information
- Instructions for use
1. What Hemlibra is and what it is used for
What Hemlibra is
Hemlibra contains the active substance “emicizumab”. This belongs to a group of medicines known as “monoclonal antibodies”. Monoclonal antibodies are a type of protein that recognises and binds to a specific target in the body.
What Hemlibra is used for
Hemlibra is a medicine that can be used to treat patients of all ages with haemophilia A (congenital factor VIII deficiency):
-
who have developed factor VIII inhibitors
-
who have not developed factor VIII inhibitors with:
-
severe disease (factor VIII level in blood is less than 1%)
-
moderate disease (factor VIII level in blood is 1% to 5%) with a severe bleeding phenotype.
Haemophilia A is an inherited condition caused by a lack of factor VIII, an essential substance required for blood to clot and to stop bleeding.
The medicine prevents bleeding or reduces bleeding episodes in people with this condition.
Some patients with haemophilia A may develop factor VIII inhibitors (antibodies against factor VIII), which prevent replacement factor VIII from working.
How Hemlibra works
Hemlibra restores the missing activated factor VIII function necessary for effective blood coagulation. Its structure is different from factor VIII, therefore, Hemlibra is not affected by factor VIII inhibitors.
2. What you need to know before using Hemlibra
Do not use Hemlibra
- if you are allergic to emicizumab or to any of the other ingredients of this medicine (listed in section 6). If you are unsure, consult your doctor, pharmacist, or nurse before starting treatment with Hemlibra.
Warnings and precautions
Before starting Hemlibra, it is very important that you consult your doctor about the use of “bypassing agents” (medicines that help blood to clot, but work differently from factor VIII). This is because you may need to adjust your treatment with bypassing agents while receiving Hemlibra. Examples of bypassing agents include activated prothrombin complex concentrate (aPCC) and recombinant factor VIIa (rFVIIa). Serious and potentially life-threatening side effects can occur when aPCC is used in patients also receiving Hemlibra:
Potentially serious side effects of using aPCC while receiving Hemlibra
-
Destruction of red blood cells (thrombotic microangiopathy)
-
This is a serious and potentially life-threatening condition.
-
When a person has this condition, the lining of blood vessels may be damaged and blood clots may form in small blood vessels. In some cases, this can lead to damage in the kidneys or other organs.
-
You should be cautious if you are at high risk of developing this condition (if you or a family member has had this condition in the past), or if you are taking medicines that may increase the risk of developing this condition, such as cyclosporine, quinine, and tacrolimus.
-
It is important to be aware of the symptoms of thrombotic microangiopathy in case you develop this condition (see section 4, “Possible side effects” for a list of symptoms).
Stop using Hemlibra and aPCC and contact your doctor immediately if you or your caregiver notice any symptoms of thrombotic microangiopathy.
-
Blood clots (thromboembolism)
-
In rare cases, a blood clot may form within blood vessels and block them, which could potentially be life-threatening.
-
It is important to be aware of the symptoms of such internal blood clots in case they occur (see section 4, “Possible side effects” for a list of symptoms).
Stop using Hemlibra and aPCC and contact your doctor immediately if you or your caregiver notice any symptoms of blood clots in blood vessels.
Other important information about Hemlibra
-
Antibody formation (immunogenicity)
-
You may notice that your bleeding is not being controlled by the prescribed dose of this medicine. This may be due to the development of antibodies against this medicine.
Talk to your doctor immediately if you or your caregiver notice an increase in bleeding episodes. Your doctor may decide to change your treatment if this medicine stops working for you.
Children under 1 year of age
In children under 1 year of age, the blood system is still developing. If your child is under one year old, your doctor may prescribe Hemlibra only after carefully evaluating the expected benefits and risks of using Hemlibra.
Other medicines and Hemlibra
Inform your doctor or pharmacist if you are taking, have recently taken, or might need to take any other medicines.
-
Use of a bypassing agent while receiving Hemlibra
-
Before starting Hemlibra, consult your doctor and carefully follow their instructions regarding when to use a bypassing agent and the dose and regimen to follow. Hemlibra increases the blood’s ability to clot. Therefore, the dose of bypassing agent needed may be lower than the dose you used before starting Hemlibra.
-
Use aPCC only if no other treatment is available. If aPCC is required, consult your doctor if you think you need more than 50 units/kg of aPCC in total. For further information on the use of aPCC while receiving Hemlibra, see section 2: Potentially serious side effects of using aPCC while receiving Hemlibra.
-
Despite limited experience with concomitant administration of antifibrinolytics with aPCC or rFVIIa in patients treated with Hemlibra, you should be aware that thrombotic events may occur when intravenous antifibrinolytics are used in combination with aPCC or rFVIIa.
Laboratory tests
Consult your doctor if you are using Hemlibra before undergoing blood tests to measure blood clotting ability. This is because the presence of Hemlibra in the blood may interfere with certain laboratory tests and lead to inaccurate results.
Pregnancy and breastfeeding
- You should use an effective method of birth control (contraception) during treatment with Hemlibra and for 6 months after the last injection of Hemlibra.
- If you are pregnant or breastfeeding, think you may be pregnant, or plan to become pregnant, consult your doctor or pharmacist before using this medicine. Your doctor will weigh the benefits of your taking Hemlibra against any potential risks to your baby.
Driving and using machines
It is unlikely that this medicine will affect your ability to drive or operate machinery.
3. How to use Hemlibra
Hemlibra is supplied in single-use vials as a ready-to-use solution that does not need to be diluted. A qualified physician experienced in treating patients with hemophilia will teach you how to use Hemlibra treatment. Always follow exactly the administration instructions provided by your doctor. If you have any doubts, consult your doctor again.
Keep a record
Each time you use Hemlibra, record the name and batch number of the medicine.
How much Hemlibra to use
The dose of Hemlibra depends on your body weight, and your doctor will calculate the amount (in mg) and the corresponding volume of Hemlibra solution (in ml) to be injected:
-
Loading dose regimen, weeks 1–4: the dose is 3 milligrams per kilogram of body weight, administered once weekly.
-
Maintenance dose regimen, week 5 and onwards: the dose is either 1.5 milligrams per kilogram of body weight, administered once weekly; 3 milligrams per kilogram of body weight, administered every two weeks; or 6 milligrams per kilogram of body weight, administered every four weeks.
The decision on whether to use the maintenance dose of 1.5 mg/kg once weekly, 3 mg/kg every two weeks, or 6 mg/kg every four weeks should be discussed with your doctor and, when applicable, with your caregiver.
Different concentrations of Hemlibra (30 mg/ml and 150 mg/ml) must not be combined in a single injection to achieve the total volume to be administered.
No more than 2 ml of Hemlibra solution should be administered in a single injection.
How Hemlibra is administered
If you or your caregiver are administering a Hemlibra injection, you must carefully read and follow the instructions provided in section 7, “Instructions for use”.
- Hemlibra is administered as a subcutaneous injection (under the skin).
- Your doctor or nurse will teach you how to inject Hemlibra.
- Once you have received proper training, you may self-administer the medicine at home, either alone or with the help of a caregiver.
- To correctly insert the needle under the skin, pinch a skin fold at the clean injection site with your free hand. It is important to form a skin fold to ensure that the injection is delivered under the skin (into the fatty tissue) and not deeper (into the muscle). An intramuscular injection could be painful.
- Prepare and administer the injection under clean, germ-free conditions using an aseptic technique. Your doctor or nurse will provide further information on this.
Where to inject Hemlibra
- Your doctor will instruct you on which body areas are suitable for Hemlibra injections.
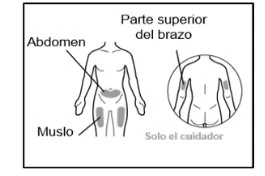
- Recommended injection sites are: the front of the waist (lower abdomen), the outer upper arm, or the front of the thighs. Use only recommended injection sites.
- For each injection, use a different body area than the one used for the previous injection.
- Do not administer injections in areas where the skin is red, bruised, tender, hardened, or in areas with moles or scars.
- When using Hemlibra, other subcutaneously injected medicines should be administered in a different body region.
Use of syringes and needles
-
To withdraw Hemlibra solution from the vial, transfer it into the syringe, and inject it subcutaneously, you will need a syringe, a 5-micron filter transfer needle or a 5-micron filter vial adapter, and an injection needle.
-
Syringes, filter transfer needles or filter vial adapters, and injection needles are not included in the package. For more information, refer to section 6, “What is needed for Hemlibra administration that is not included in the package”.
-
Always use a new injection needle for each injection and dispose of it after a single use.
-
For an injection of up to 1 ml of Hemlibra solution, a 1 ml syringe should be used.
-
For an injection greater than 1 ml and up to 2 ml of Hemlibra solution, a 2–3 ml syringe should be used.
Use in children and adolescents
Hemlibra can be used in children and adolescents of all ages.
- A child may self-inject the medicine, provided that the healthcare professional and the child’s parent or caregiver agree. Self-injection is not recommended for children under 7 years of age.
If you use more Hemlibra than you should
If you use more Hemlibra than prescribed, inform your doctor immediately. This is because you may be at risk of experiencing adverse effects such as blood clots. Always follow exactly the administration instructions provided by your doctor. If in doubt, consult your doctor, pharmacist, or nurse.
If you forget to use Hemlibra
- If you miss a scheduled injection, administer the missed dose as soon as possible before the day of your next scheduled dose. Then continue with your regular dosing schedule. Do not inject two doses on the same day to make up for a missed dose.
- If in doubt, ask your doctor, pharmacist, or nurse.
If you stop using Hemlibra
Do not stop treatment with Hemlibra without consulting your doctor. If you discontinue treatment with Hemlibra, you may no longer be protected against bleeding episodes.
If you have any further questions about the use of this medicine, ask your doctor, pharmacist, or nurse.
4. Possible side effects
Like all medicines, this medicine can cause side effects, although not everybody gets them.
Serious side effects of using FVIII (CCPd) while receiving Hemlibra
Stop using Hemlibra and FVIII (CCPd) and consult your doctor immediately if you or your caregiver notice any of the following side effects:
-
Destruction of red blood cells (thrombotic microangiopathy):
-
confusion, weakness, swelling of arms and legs, yellowing of the skin and eyes, abdominal or back pain, feeling dizzy (nausea), feeling unwell (vomiting), or urinating less than usual: these symptoms could be signs of thrombotic microangiopathy.
-
Blood clots (thromboembolism):
-
swelling, warmth, pain or redness: these symptoms could be signs of a blood clot in a vein near the surface of the skin.
-
headache, facial numbness, pain or swelling in the eyes or vision problems: these symptoms could be signs of a blood clot in a vein behind the eye.
-
skin darkening: this symptom could be a sign of serious skin tissue damage.
Other side effects of using Hemlibra
Very common: may affect more than 1 in 10 people
- reaction at the injection site (redness, itching, pain)
- headache
- joint pain
Common: may affect up to 1 in 10 people
- fever
- muscle pain
- diarrhea
- itchy rash or hives (urticaria)
- skin rash
Uncommon: may affect up to 1 in 100 people
- destruction of red blood cells (thrombotic microangiopathy)
- blood clot in a vein behind the eye (cavernous sinus thrombosis)
- serious skin tissue damage (cutaneous necrosis)
- blood clot in a vein near the surface of the skin (superficial thrombophlebitis)
- swelling of the face, tongue and/or throat and/or difficulty swallowing, or hives, together with breathing difficulties, which are indicative of angioedema
- lack of effect or reduced response to treatment
- allergic reaction
Reporting of side effects
If you experience any type of side effect, talk to your doctor, pharmacist or nurse, even if it is a side effect not listed in this leaflet. You can also report them directly through the national reporting system listed in Appendix V. By reporting side effects, you can help provide more information on the safety of this medicine.
5. Storage of Hemlibra
Keep this medicine out of the sight and reach of children.
Do not use this medicine after the expiry date stated on the label of the carton and vial after "EXP". The expiry date refers to the last day of the month indicated.
Store in a refrigerator (between 2 °C and 8 °C). Do not freeze.
Keep in the original packaging to protect from light.
After removal from the refrigerator, unopened vials may be stored at room temperature (below 30 °C) for up to 7 days. After storage at room temperature, unopened vials may be returned to the refrigerator. The total storage time of the medicine at room temperature must not exceed 7 days.
Discard vials that have been stored at room temperature for longer than 7 days or that have been exposed to temperatures above 30 °C.
Once the solution has been transferred from the vial to the syringe, use Hemlibra immediately. Do not refrigerate the solution in the syringe.
Before using the medicine, check that the solution contains no particles and no change in colour. The solution should be colourless to slightly yellow. Do not use this medicine if it appears cloudy, has changed colour, or contains visible particles.
Dispose of unused solution properly. Medicines must not be disposed of via wastewater or household waste. Ask your pharmacist how to dispose of medicines and containers that you no longer need. This will help protect the environment.
6. Contents of the pack and other information
Composition of Hemlibra
- The active substance is emicizumab. Each vial of Hemlibra contains 12 mg (0.4 ml at a concentration of 30 mg/ml) or 30 mg (1 ml at a concentration of 30 mg/ml) of emicizumab.
- The other components are L-arginine, L-histidine, L-aspartic acid, poloxamer 188, and water for injections.
Appearance of Hemlibra and contents of the pack
Hemlibra is an injectable solution. It is a colourless or slightly yellow liquid.
Each Hemlibra pack contains 1 glass vial.
Only certain pack sizes may be marketed.
What is needed for the administration of Hemlibra that is not included in the pack
To withdraw the Hemlibra solution from the vial, transfer it into a syringe, and inject it subcutaneously, a syringe, a filtered transfer needle or a filtered vial adapter, and an injection needle are required (see section 7, “Instructions for use”).
Syringes
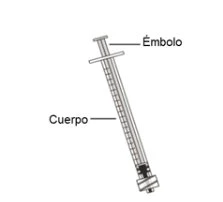
- 1 ml syringe: transparent polypropylene or polycarbonate syringe with Luer-lock tip, graduated in 0.01 ml increments or
- 2-3 ml syringe: transparent polypropylene or polycarbonate syringe with Luer-lock tip, graduated in 0.1 ml increments.
Note: Low Dead Space (LDS) syringes must be used when the filtered vial adapter is employed.
Transfer devices and needles
- Filtered transfer needle: stainless steel with Luer-lock connection, 18 G gauge, 35 mm (1½″) length, containing a 5-micron filter and preferably with a semi-blunt tip or
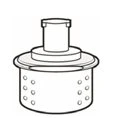
- Filtered vial adapter: polypropylene with Luer-lock connection, with an integrated 5-micron filter and designed to fit an outer vial neck diameter of 15 mm and
- Injection needle: stainless steel with Luer-lock connection, 26 G gauge (acceptable range: 25–27 G), preferably 9 mm (3/8″) in length or up to a maximum of 13 mm (½″), preferably with needle safety feature.
Marketing Authorization Holder
Roche Registration GmbH
Emil-Barell-Strasse 1
79639 Grenzach-Wyhlen
Germany
Manufacturer responsible for manufacturing
Roche Pharma AG
Emil-Barell-Strasse 1
79639 Grenzach-Wyhlen
Germany
More information about this medicinal product is available upon request to the local representative of the Marketing Authorization Holder:
Belgium/Belgium/Belgium, Luxembourg/Luxembourg N.V. Roche S.A. Belgium/Belgium/Belgium Tel/Tel: +32 (0) 2 525 82 11 | Lithuania UAB “Roche Lietuva” Tel: +370 5 2546799 |
| |
Czech Republic Roche s. r. o. Tel: +420 - 2 20382111 | Hungary Roche (Hungary) Kft. Tel: +36 1 279 4500 |
Denmark Roche Pharmaceutical A/S Tlf: +45 - 36 39 99 99 | |
Germany Roche Pharma AG Tel: +49 (0) 7624 140 | Netherlands Roche Nederland B.V. Tel: +31 (0) 348 438000 |
Estonia Roche Eesti OÜ Tel: + 372 - 6 177 380 | Norway Roche Norge AS Tlf: +47 - 22 78 90 00 |
Greece, Cyprus Roche (Hellas) A.E. Greece Tel: +30 210 61 66 100 | Austria Roche Austria GmbH Tel: +43 (0) 1 27739 |
Spain Roche Farma S.A. Tel: +34 - 91 324 81 00 | Poland Roche Polska Sp. z o.o. Tel: +48 - 22 345 18 88 |
France Roche Tél: +33 (0) 1 47 61 40 00 | Portugal Roche Farmacêutica Química, Lda Tel: +351 - 21 425 70 00 |
Croatia Roche d.o.o. Tel: +385 1 4722 333 | Romania Roche România S.R.L. Tel: +40 21 206 47 01 |
Ireland, Malta Roche Products (Ireland) Ltd. Ireland/Ireland Tel: +353 (0) 1 469 0700 | Slovenia Roche farmacevtska družba d.o.o. Tel: +386 - 1 360 26 00 |
Iceland Roche Pharmaceutical A/S c/o Icepharma hf Sími: +354 540 8000 | Slovakia Roche Slovensko, s.r.o. Tel: +421 - 2 52638201 |
Italy Roche S.p.A. Tel: +39 - 039 2471 | Finland/Finland Roche Oy Puh/Tel: +358 (0) 10 554 500 |
Sweden Roche AB Tel: +46 (0) 8 726 1200 | |
Latvia Roche Latvija SIA Tel: +371 - 6 7039831 |
Date of the most recent review of this leaflet
Other sources of information
Detailed information on this medicine is available on the website of the European Medicines Agency: http://www.ema.euopa.eu/
7. Instructions for use
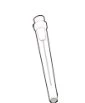
Transfer Needle with Filter Option (to transfer medication from vial to syringe)
|
Instructions for use
Hemlibra
Injection
Single-dose vial(s)
You must read, understand, and follow the instructions for use before injecting Hemlibra. Your healthcare professional should train you on how to properly prepare, measure, and inject Hemlibra before your first use. If in doubt, consult your healthcare professional.
Important information:
Do not follow these instructions when using a Vial Adapter to transfer Hemlibra from the vial. These instructions are for use with the Transfer Needle only. |
-
Do not inject yourself or another person unless your healthcare professional has shown you how to do so.
-
Check that the name Hemlibra appears on the carton and the vial label.
-
Before opening the vial, read the label on the vial to confirm that you have the medicine with the correct concentration to administer the prescribed dose. You may need to use more than one vial to administer the full correct dose.
-
Check the expiry date printed on the carton and the vial label. Do not use after the expiry date.
-
Use the vial only once. After injecting the dose, discard any remaining Hemlibra solution left in the vial. Do not store unused medicine in the vial for later use.
-
Only use the syringes, transfer needles, and injection needles prescribed by your healthcare professional.
-
Use the syringes, transfer needles, and injection needles only once.
Discard the caps, vial(s), syringes, and used needles.
-
If the prescribed dose is greater than 2 ml, you will need to administer more than one subcutaneous injection of Hemlibra; contact your healthcare professional for appropriate injection instructions.
-
You must inject Hemlibra only under the skin.
Storage of Hemlibra vials:
-
Store the vial in the refrigerator (2 °C to 8 °C). Do not freeze.
-
Keep the vial in the original packaging to protect the medicine from light.
-
Once removed from the refrigerator, the unopened vial may be stored at room temperature (below 30 °C) for up to 7 days. After storage at room temperature, unopened vials may be returned to the refrigerator. The total time stored outside the refrigerator at room temperature must not exceed 7 days.
-
Discard vials that have been kept at room temperature for more than 7 days or have been exposed to temperatures above 30 °C.
-
Keep vials out of the sight and reach of children.
-
Remove the vial from the refrigerator 15 minutes before use and allow it to reach room temperature (below 30 °C) before preparing an injection.
-
Do not shake the vial.
Storage of needles and syringes:
-
Keep the transfer needle, injection needle, and syringe dry.
-
Keep the transfer needle, injection needle, and syringe out of the sight and reach of children.
Inspection of medicine and materials:
-
Gather all the materials listed below to prepare and administer the injection.
-
Check the expiry date printed on the carton, the vial label, and the materials listed below. Do not use after the expiry date.
-
Do not use the vial if:
-
the medicine is cloudy, hazy, or has changed color.
-
the medicine contains particles.
-
the cap covering the stopper is missing.
-
Inspect the materials for damage. Do not use if they appear damaged or have been dropped on the floor.
-
Place the materials on a flat, clean, and well-lit work surface.
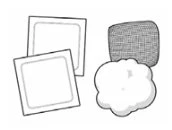
The carton contains:
|
|
|
|
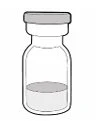
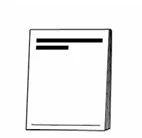
The box does not include:
|
Note: If you need to use more than 1 vial to inject the prescribed dose, use a new alcohol wipe for each vial.
|
|
1 ml syringe.
2 ml, use a 2 ml or 3 ml syringe.
|
|
18G
to inject the prescribed dose, use a new transfer needle for each vial.
|
|
(used to inject the medication).
withdraw medication from the vial. |
|
for sharp objects |
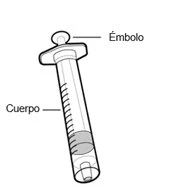
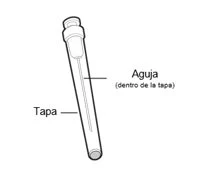
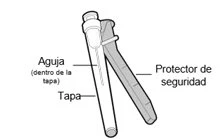
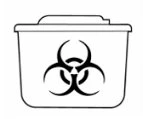
Prepare:
|
|
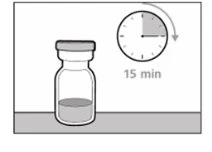
Selection and preparation of the injection site:
|
with an alcohol wipe.
before injecting. |
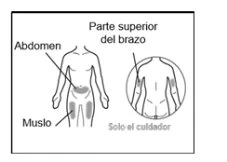
For injection, you may use:
- The thigh (front and middle part).
- The stomach area (abdomen), except for the 5 cm around the navel.
- The outer upper arm area (only if a caregiver administers the injection).
- You must use a different injection site each time, at least 2.5 cm away from the site used in any previous injection.
- Do not inject into areas that might be irritated by a belt or girdle.
- Do not inject into moles, scars, bruises, or areas where the skin is tender, red, hardened, or damaged.
Preparing the syringe for injection:
-
Once the syringe has been filled with the medicine, it must be used immediately.
-
After removing the needle cap, the medicine must be injected under the skin within 5 minutes.
-
Do not touch exposed needles or place them on any surface after removing the cap.
-
Do not use the syringe if the needle touches any surface.
Important information after injection:
-
If you see blood droplets at the injection site, press with a sterile cotton ball or gauze for at least 10 seconds until bleeding stops.
-
If you develop a bruise (a small bleed under the skin), you may also apply ice with light pressure. If bleeding does not stop, contact a healthcare professional.
-
Do not rub the injection site after injection.
Disposal of medicine and materials:
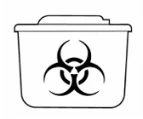
Important: Always keep the sharps container out of the reach of children.
-
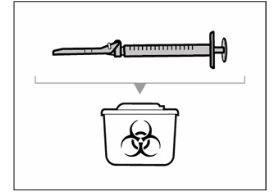
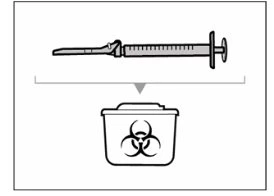
Dispose of any caps, vials, needles, and used syringes in a sharps container. Discard used needles and syringes into a sharps container immediately after use. Do not dispose of loose caps, vials, needles, or syringes in household trash.
-
If you do not have a sharps container, you may use a household waste container that:
-
is made of puncture-resistant plastic.
-
can be closed with a tight, puncture-resistant cap that prevents sharps from coming out.
-
remains upright and stable during use.
-
is leak-proof.
-
is clearly labeled as containing hazardous waste.
-
When the sharps container is nearly full, follow local guidelines for proper disposal.
-
Do not dispose of any used sharps container in household trash unless local guidelines permit it. Do not recycle your sharps container.
- PREPARATION
Step 1. Remove the vial cap and clean the top
|
|
|
|
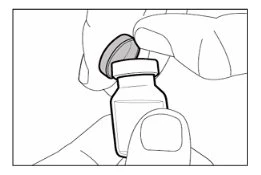
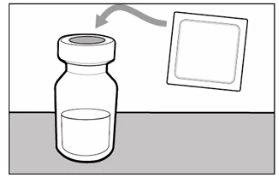
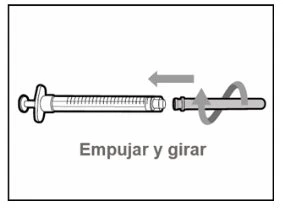
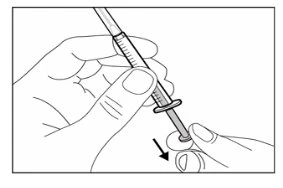
Step 2. Attach the transfer needle with filter to the syringe
|
|
|
|
Step 3. Remove the transfer needle cap
|
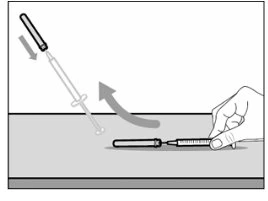
Remove the transfer needle cap carefully, keeping it away from you. Do not discard the cap. Place the transfer needle cap cap-side down on a clean, flat surface. You will need to recap the transfer needle after transferring the medication.
|
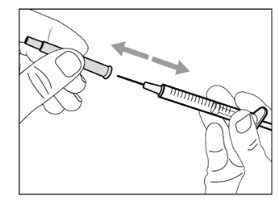
Step 4. Inject air into the vial
|
|
|
|
|
|
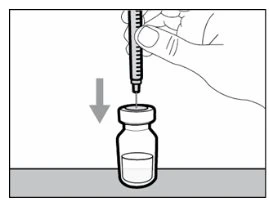
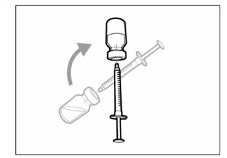
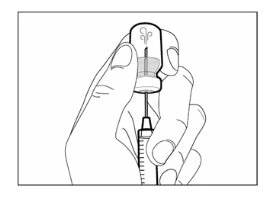
Step 5. Transfer the medication to the syringe
|
|
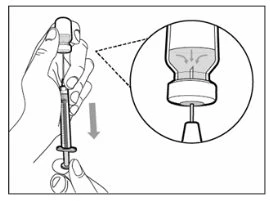
Important: If the prescribed dose is greater than the amount of Hemlibra in the vial, withdraw all the medication and refer now to the section “Combining vials”.
Step 6. Remove air bubbles
|
|
|
|
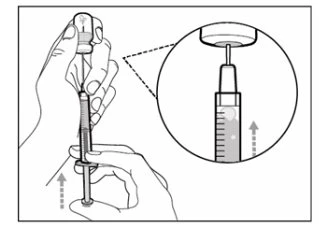
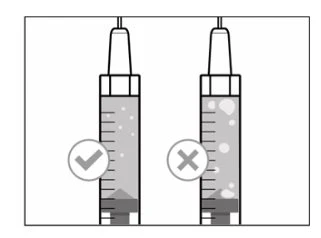
Note: Check that you have enough medication in the syringe to complete the dose before proceeding to the next step. If you cannot withdraw all the medication, turn the vial upside down to access the remaining amount. |
 Do not use the transfer needle to inject the medicine, as this could cause pain and bleeding.
- INJECTION
Step 7. Replace the cap on the transfer needle
|
|
Step 8. Clean the injection site
|
an alcohol wipe. |
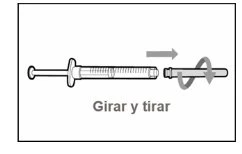
Step 9. Remove the used transfer needle from the syringe
|
|
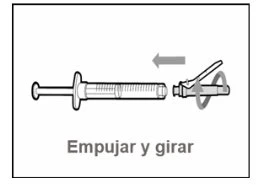
Step 10. Place the injection needle on the syringe
|
|
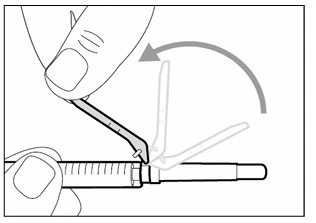
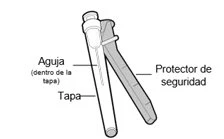
Step 11. Remove the safety shield
|
|
Step 12. Uncover the injection needle
|
|
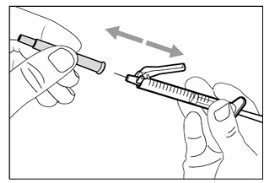
Step 13. Adjust the plunger according to the prescribed dose
|
|
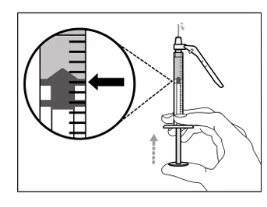
Step 14. Subcutaneous injection (under the skin)
|
|
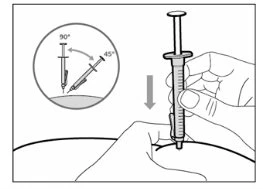
Step 15. Inject the medication
|
|
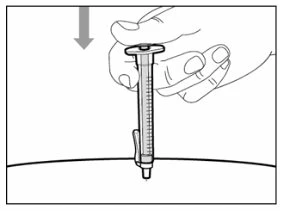
- DISPOSAL OF THE SYRINGE AND NEEDLE
Step 16. Secure the needle with the safety shield
|
|
|
|
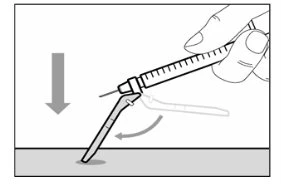
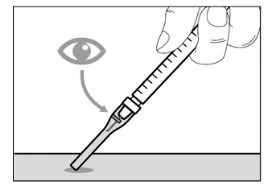
Step 17. Dispose of the syringe and needle.
|
further information, see the section "Disposal of the medicine and materials".
from the syringe.
with the cap.
out of the reach of children.
syringes in the sharps container. |
Combination of vials
If you need to use more than one vial to achieve the prescribed dose, follow these steps after withdrawing the medication from the first vial as described in Step 5. You must use a new transfer needle for each vial.
Step A. Replace the cap on the transfer needle
|
from the first vial.
|
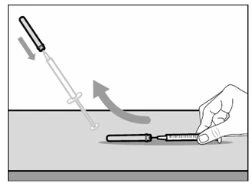
Step B. Remove the used transfer needle from the syringe
|
|
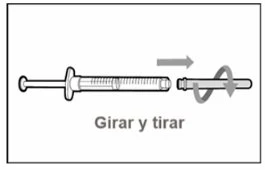
Step C. Place a new filter transfer needle on the syringe
|
|
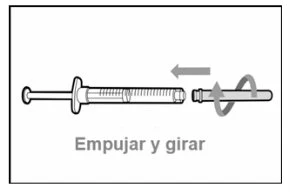
Step D. Remove the transfer needle cap
|
|
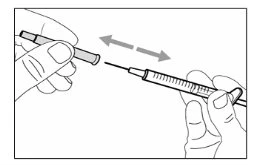
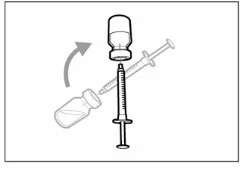
Step E. Inject air into the vial
|
|
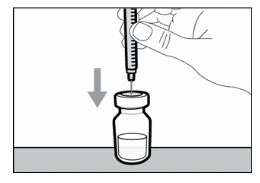
|
|
|
|
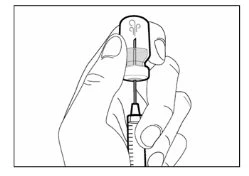
Step F. Transfer the medication to the syringe
|
|
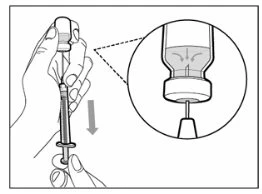
Note: Check that you have enough medication in the syringe to complete the dose before proceeding to the following steps. If you cannot withdraw all the medication, invert the vial upright to access the remaining amount |
 Do not use the transfer needle to inject the medicine, as it could cause harm such as pain and bleeding.
Repeat steps A through F with each additional vial until you have more than the amount of medication needed for your prescribed dose. When finished, keep the transfer needle inserted in the vial and return to step 6, "Remove air bubbles." Continue with the remaining steps. |
Vial adapter with filter Option (to transfer medication from vial to syringe )
|

Instructions for use
Hemlibra
Injection
Single-dose vial(s)
You must read, understand, and follow the instructions for use before injecting Hemlibra. Your healthcare professional should train you on how to properly prepare, measure, and inject Hemlibra before you use it for the first time. If you have any doubts, consult your healthcare professional.
Important information:
Do not follow these instructions when using a Vial Adapter to transfer Hemlibra from the vial. These instructions are only used with the Transfer Needle. |
-
Do not inject yourself or another person unless your healthcare professional has shown you how to do so.
-
Check that the name Hemlibra appears on the carton and on the vial label.
-
Before opening the vial, read the label on the vial to confirm that you have the medicine of the correct concentration to administer the prescribed dose. You may need to use more than 1 vial to administer the correct total dose.
-
Check the expiry date on the carton and on the vial label. Do not use after the expiry date.
-
Use the vial only once. After the dose has been injected, discard any remaining Hemlibra solution left in the vial. Do not store unused medicine in the vial for later use.
-
Use only the syringes, transfer needles, and injection needles prescribed by your healthcare professional.
-
Use the syringes, transfer needles, and injection needles only once.
Discard the caps, vial(s), syringes, and used needles.
-
If the prescribed dose is greater than 2 ml, you will need to administer more than one subcutaneous injection of Hemlibra; contact your healthcare professional for appropriate injection instructions.
-
You must inject Hemlibra only under the skin.
Storage of Hemlibra vials:
- Store the vial in the refrigerator (2 °C to 8 °C). Do not freeze.
- Keep the vial in the original packaging to protect the medicine from light.
- Once removed from the refrigerator, the unopened vial may be stored at room temperature (below 30 °C) for up to 7 days. After storage at room temperature, unopened vials may be returned to the refrigerator. The total time stored outside the refrigerator at room temperature must not exceed 7 days.
- Discard vials that have been kept at room temperature for more than 7 days or have been exposed to temperatures above 30 °C.
- Keep vials out of the sight and reach of children.
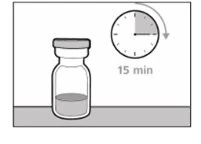
- Remove the vial from the refrigerator 15 minutes before use and allow it to reach room temperature (below 30 °C) before preparing an injection.
- Do not shake the vial.
Storage of needles and syringes:
-
Keep the transfer needle, injection needle, and syringe dry.
-
Keep the transfer needle, injection needle, and syringe out of the sight and reach of children.
Inspection of medicine and materials:
-
Gather all the materials listed below to prepare and administer the injection.
-
Check the expiry date on the carton, on the vial label, and on the materials listed below. Do not use after the expiry date.
-
Do not use the vial if:
-
the medicine is cloudy, hazy, or has changed color.
-
the medicine contains particles.
-
the cap covering the stopper is missing.
-
Inspect the materials for damage. Do not use if they appear damaged or have been dropped on the floor.
-
Place the materials on a flat, clean, and well-lit work surface.
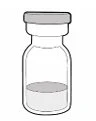
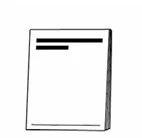
The carton contains:
|
|
|
|
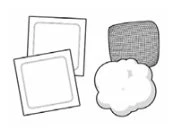
The box does not include:
|
Note: If you need to use more than 1 vial to inject the prescribed dose, you must use a new alcohol wipe for each vial.
|
|
Note: Use it to transfer medicine from the vial to the syringe. If you need more than 1 vial to inject the prescribed dose, you must use a new vial adapter for each vial. Do not insert the injection needle into the vial adapter. |
|
Important:
|
|
the medication).
|
|
|
Prepare:
|
|
Selection and preparation of the injection site:
|
|
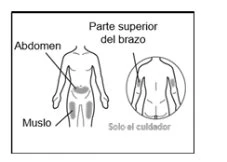
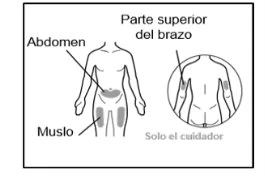
For injection, you may use:
-
The thigh (front and middle part).
-
The stomach area (abdomen), except for the 5 cm around the navel.
-
The outer side of the upper arm (only if the caregiver administers the injection).
-
You should use a different injection site each time, at least 2.5 cm away from the site used for any previous injection.
-
Do not inject into areas that might be irritated by a belt or girdle.
-
Do not inject into moles, scars, bruises, or areas where the skin is tender, red, hardened, or damaged.
Preparing the syringe for injection:
-
Once the syringe has been filled with the medicine, the injection should be administered immediately.
-
Once the needle cap has been removed, the medicine must be injected under the skin within 5 minutes.
-
Do not touch exposed needles or place them on any surface after removing the cap.
-
Do not use the syringe if the needle touches any surface.
Important information after injection:
-
If you see blood droplets at the injection site, you may press it with sterile cotton or gauze for at least 10 seconds until bleeding stops.
-
If you develop a bruise (a small bleed under the skin), you may also apply ice with light pressure. If bleeding does not stop, contact a healthcare professional.
-
Do not rub the injection site after the injection.
Disposal of medicine and materials:
Important: Always keep the sharps container out of reach of children.
-
Dispose of any cap(s), vial(s), needles, and used syringes in a sharps container.
-
Discard used needles and syringes into a sharps container immediately after use. Do not dispose of loose caps, vials, needles, or syringes in household trash.
-
If you do not have a sharps container, you may use a household waste container that:
-
is made of rigid plastic.
-
can be closed with a tight-fitting, puncture-resistant lid that prevents sharps from coming out.
-
remains upright and stable during use.
-
is leak-proof.
-
is clearly labeled to indicate it contains hazardous waste.
-
When the sharps container is nearly full, follow local guidelines for proper disposal.
-
Do not dispose of any used sharps container in household trash unless local guidelines permit it. Do not recycle your sharps container.
- PREPARATION
Step 1. Remove the vial cap and clean the top
|
|
|
|
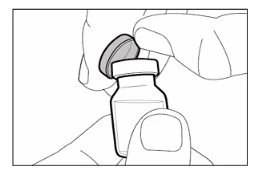
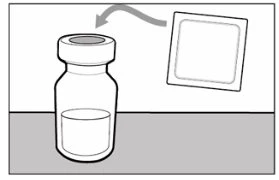
Step 2. Attach the transfer needle with filter to the syringe
|
Do not remove the vial adapter from the clear plastic blister. |
|
|
|
|
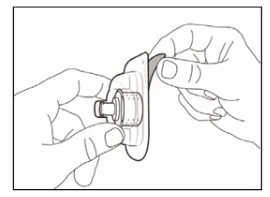
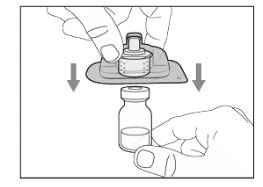
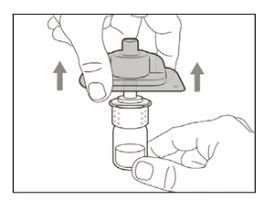
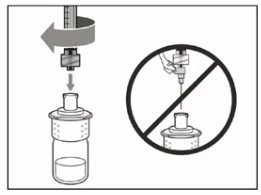
Step 3. Connect the syringe to the vial adapter
|
Do not insert the injection needle into the vial adapter. |
Step 4. Transfer the medication to the syringe
|
|
|
|
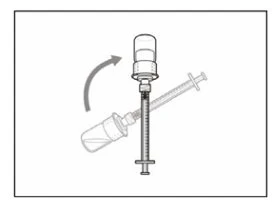
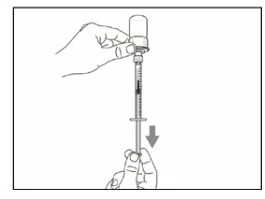
Important: if the prescribed dose is higher than the amount of Hemlibra in the vial, withdraw all the medication and refer now to the section "Combining vials". |
Step 5. Remove air bubbles
|
|
|
|
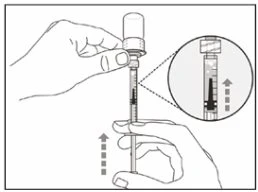
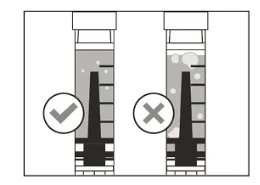
Note: check that you have enough medicine in the syringe to complete the dose before moving on to the next step. |
- INJECTION
Step 6. Clean the injection site
|
|
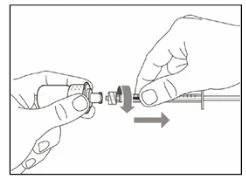
Step 7. Remove the syringe from the vial adapter
|
|
Step 8. Place the injection needle on the syringe
|
|
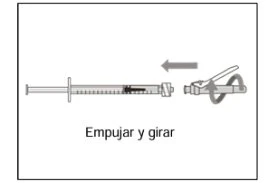
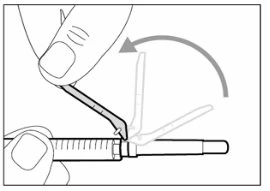
Step 9. Remove the safety protector
|
|
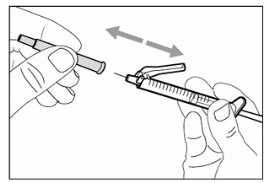
Step 10. Uncover the injection needle
|
|
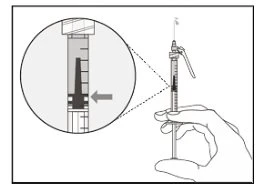
Step 11. Adjust the plunger according to the prescribed dose
|
|
Step 12. Subcutaneous injection (under the skin)
|
|
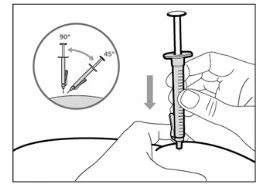
Step 13. Inject the medication
|
|
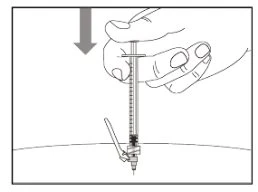
- Disposal
Step 14. Cover the needle with the safety cap
|
|
|
|
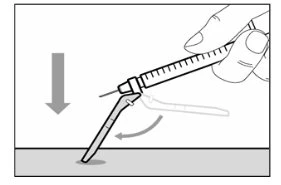
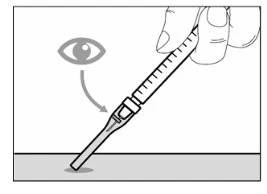
Step 15. Dispose of the syringe and needle.
|
further information, see the section "Disposal of the medicine and materials".
from the syringe.
with the cap.
|
Combination of vials
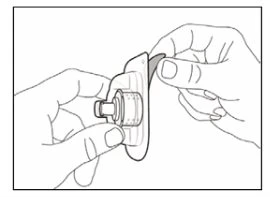
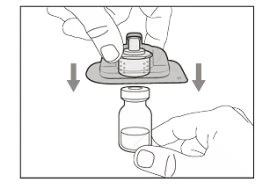
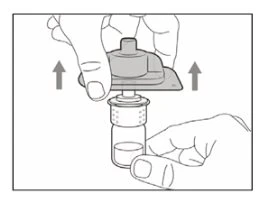
If you need to use more than one vial to achieve the prescribed dose, follow these steps after withdrawing the medication from the first vial as described in step 5. You must use a new transfer needle for each vial. |
Step A. Replace the transfer needle cap
|
Do not remove the vial adapter from the clear plastic blister. |
|
|
|
|
Step B. Remove the syringe from the used vial adapter
|
|
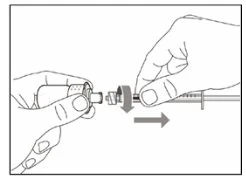
Step C. Attach the syringe to the new vial adapter
|
|
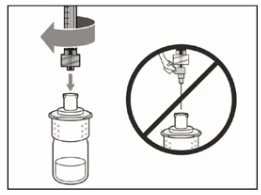
Step DTransfer the medication to the syringe
|
|
|
|
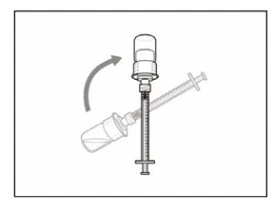
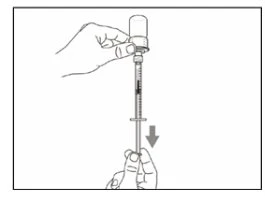
Note: Check that you have enough medication in the syringe to complete the dose before moving on to the next step. |
Repeat steps A through D with each additional vial until you have the required amount of medication for your prescribed dose. When finished, keep the vial adapter attached to the vial and return to step 5, “Remove Air Bubbles.” Continue with the remaining steps. |